
Caramel Apple Hand Pies

Easy-to-make, perfectly portioned caramel apple hand pies filled with spiced Honeycrisp apples and silky caramel — the best parts of apple pie you can hold.
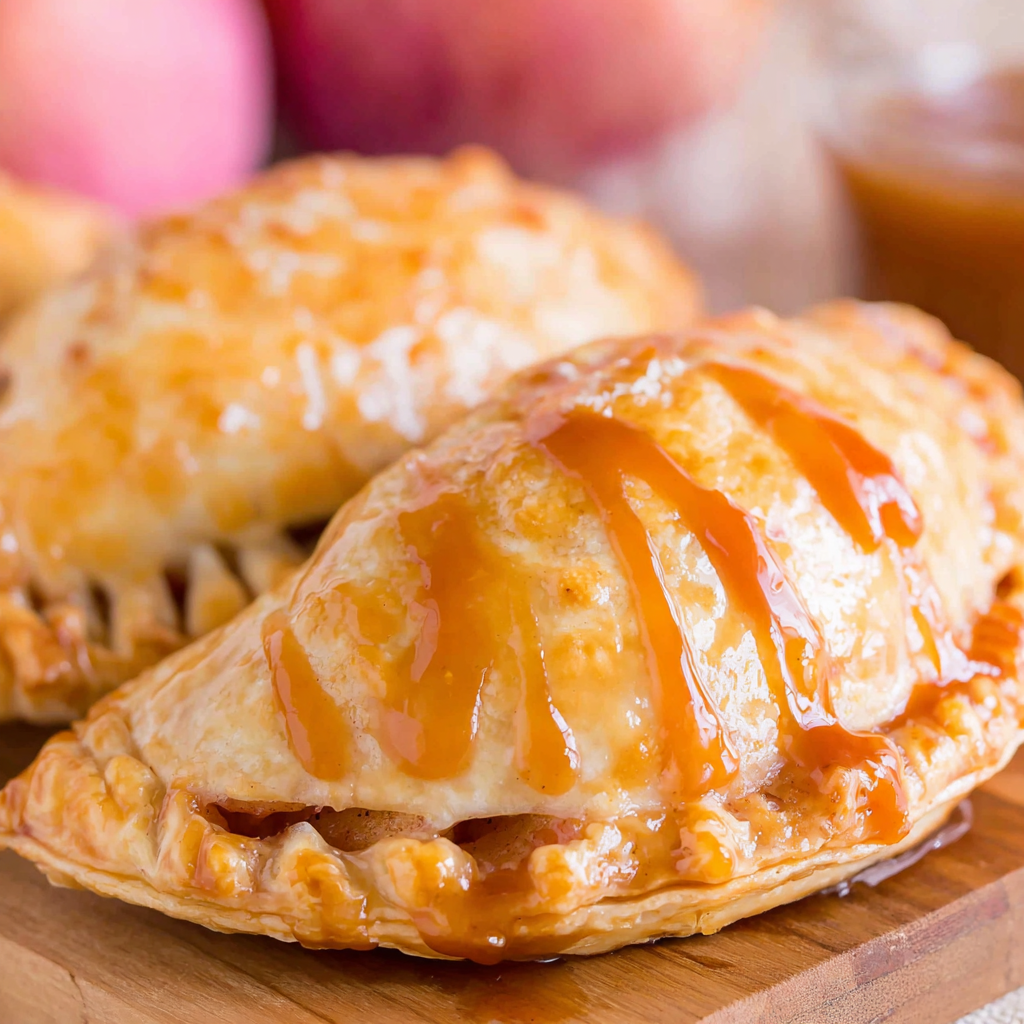
This recipe for caramel apple hand pies has become my go-to for crisp fall afternoons and last-minute dessert needs. I first put these together the year my daughter started bringing homemade treats to school for fall parties; I wanted something portable, date-friendly, and full of cinnamon-and-caramel nostalgia. The result is a small pastry pocket that captures the buttery crust, tender spiced apples, and that sticky-sweet caramel drizzle we all crave. They bake up golden, with a lightly crisp exterior and a warm, gooey interior that oozes just enough caramel without turning soggy.
I discovered the particular joy of using Honeycrisp apples for this preparation because their firm flesh holds up during a quick stovetop cook, giving you tender yet defined pieces in each bite. These hand pies are simple enough for a weekday treat yet pretty enough for guests. They are a dessert you can carry to a picnic, hand to a neighbor, or serve at an intimate gathering with a scoop of vanilla. The combination of sweet caramel syrup, dark brown sugar, and a whisper of allspice creates a depth of flavor that feels classic but a little elevated.
Why You'll Love This Recipe
- Perfectly portioned single-serve pouches make serving effortless for parties, school lunches, and grab-and-go breakfasts.
- Ready in about 40 minutes from start to finish — 20 minutes active prep and a quick 13 to 16 minute bake — so you can get a warm batch on the table fast.
- Uses pantry-friendly ingredients and a store-bought pie crust to save time while delivering bakery-style results without complex techniques.
- Flexible filling: use premade caramel syrup for convenience or chopped caramels if you want a denser, chewier filling texture.
- Make-ahead friendly — you can assemble and freeze raw pies for up to three months, then bake directly from frozen adding a few extra minutes.
- Child-friendly to assemble: the dimple-fill-cut-seal method is a fun, hands-on activity for kids learning basic pastry work.
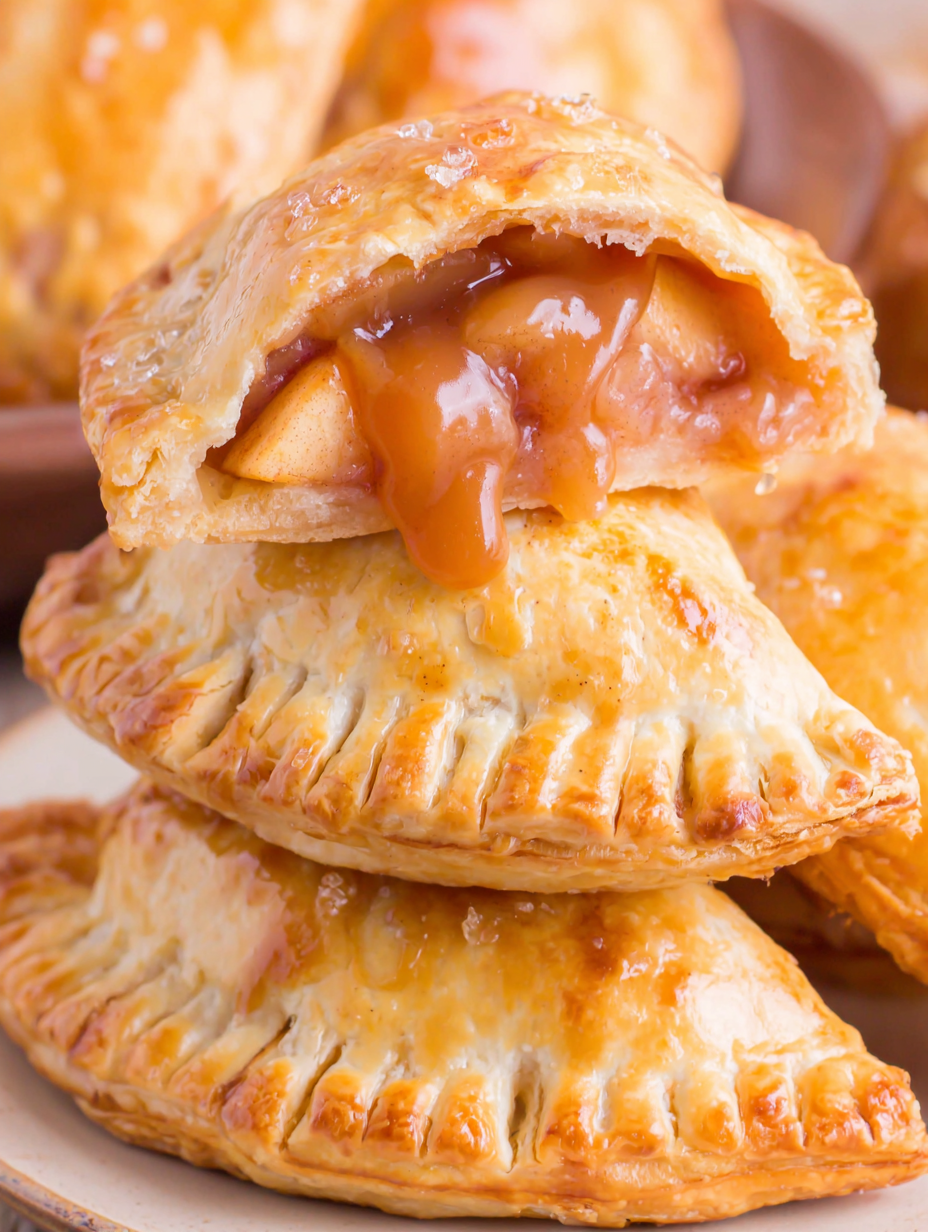
When I first served these at a neighborhood potluck, they disappeared before my second tray made it out of the oven. Family members complimented the crisp edges and how the caramel hugged the apple pieces without turning the crust soggy. Over time I tweaked the apple-to-caramel ratio to 1 1/2 tablespoons per pocket to keep the filling flavorful but stable; it proved to be the perfect balance for both adults and kids.
Ingredients
- Honeycrisp apples: Peel, core, and dice 2 small Honeycrisp apples to yield about 1 1/2 cups. Choose apples that are firm and aromatic; Honeycrisp keeps texture during the quick stovetop cook and adds bright acidity to balance the caramel.
- Caramel syrup: Use 1/3 cup of a good-quality caramel syrup for immediate smoothness. I like Smucker's or Ghirardelli caramel syrups for reliable flavor; if using salted caramel, reduce added butter slightly.
- Dark brown sugar: 1/3 cup lightly packed adds molasses depth that rounds out the apple flavor and gives the sauce a rich color.
- Salted butter: 1/4 cup (1/2 stick) melts into the sauce to create a velvety mouthfeel. If you prefer control over salt, use unsalted butter and add a pinch of sea salt to taste.
- Allspice: 1/2 teaspoon gives a warm, clove-like note; you can also use a mix of ground cinnamon and nutmeg in equal parts if allspice isn’t available.
- Premade refrigerated pie crust: One 14.1 ounce package containing two crusts supplies enough dough for 16 hand pies. Use a high-quality brand for flaky layers; Pillsbury and store-brand refrigerated crusts both work well.
- Egg and heavy cream: One large egg whisked with 1 tablespoon heavy cream makes a shiny egg wash that encourages deep golden browning and seals edges.
Instructions
Preheat and prepare: Preheat the oven to 400 degrees Fahrenheit and line two sheet pans with parchment paper. This temperature creates a quick rise in the crust for flakiness while ensuring the filling heats through during the 13 to 16 minute bake. Make the filling: In a medium skillet combine the diced Honeycrisp apples, 1/3 cup caramel syrup, 1/3 cup lightly packed dark brown sugar, 1/4 cup (1/2 stick) salted butter, and 1/2 teaspoon allspice. Heat over medium-high and cook until apples are fork tender, about five minutes; stir frequently so the sugar melts evenly and the butter emulsifies into a glossy sauce. Remove from heat and let cool for about ten minutes until warm but not boiling. Prepare the dough: On a lightly floured surface, unroll both pie crusts and use a rolling pin to press them just slightly to even thickness. Using a 3 to 4 inch round cookie cutter or a sandwich sealer, stamp 8 circles from each crust. On the bottom crust sheet, gently press indents with the cutter to mark where to place 1 1/2 tablespoons of filling per circle. Assemble the pockets: Spoon 1 1/2 tablespoons of the cooled apple filling into each bottom circle. Lay the second sheet of dough over the filled circles, making sure there is enough overlap to seal. Press the edges around each filled circle to push air out and seal the pockets. Use a sandwich sealer if you have one or cut each pie with a cookie cutter and press the edges with a fork to crimp. Vent and egg wash: Cut three small slits in the center of each top crust to vent steam during baking. Whisk one large egg with 1 tablespoon heavy cream to make an egg wash and brush the tops to encourage a glossy, golden finish. Bake and cool: Bake on the prepared sheet pans for 13 to 16 minutes or until the tops are deep golden brown. Allow the pies to cool on the pan for several minutes so the filling sets; transfer to a rack to cool further before serving to avoid burns from very hot caramel.
You Must Know
- These pockets store well in an airtight container at room temperature for up to 24 hours and in the refrigerator for 3 days; they freeze excellently for up to 3 months uncooked.
- Each individual portion has about 501 calories; moderate serving is ideal with coffee or a small scoop of ice cream to balance sweetness.
- Use firm apples such as Honeycrisp or Granny Smith for structure; softer varieties will break down and produce excess moisture.
- To avoid soggy bottoms, drain any excess sauce from the filling and allow the cooked mixture to cool slightly before filling the dough.
I love how adaptable these pouches are. I often double the filling to make tacos of apple mixture to serve alongside pancakes, and I’ve learned that sealing edges firmly and venting the tops prevents bubbling over in the oven. Family members often request them warm with a tiny pat of butter or a scoop of vanilla bean ice cream for special Sundays.
Storage Tips
Store cooled pies in an airtight container at room temperature for up to 24 hours to preserve a tender crust. For longer storage, refrigerate up to three days; reheat in a 350 degrees Fahrenheit oven for 8 to 10 minutes to refresh crispness. To freeze, assemble on a sheet pan and freeze solid before transferring to a freezer bag; bake from frozen at 375 degrees Fahrenheit for 18 to 22 minutes or until golden. Use parchment or silicone-lined containers to avoid sticking and protect the crust.
Ingredient Substitutions
If you prefer a less-sweet filling, swap dark brown sugar for light brown sugar or reduce to 1/4 cup. For a dairy-free alternative, substitute vegan butter and a plant-based cream for the egg wash; brush with a thin glaze of maple syrup for shine. If you cannot find caramel syrup, finely chop 8 soft caramels and melt them with a splash of heavy cream over low heat to achieve a similar texture. For spice variation, replace allspice with 1/2 teaspoon ground cinnamon.
Serving Suggestions
Serve warm with a scoop of vanilla ice cream or a drizzle of heavy cream. For brunch, pair with strong coffee or cider; for a party, arrange on a platter with small bowls of extra caramel sauce and whipped cream. Garnish individual pies with a dusting of powdered sugar or a tiny sprinkle of flaky sea salt to highlight the caramel. These pockets also pair well with sharp cheddar for a savory-sweet contrast.
Cultural Background
The concept of hand-held pies traces back to many culinary traditions that value portable food, from British Cornish pasties to North American turnovers. The American love of apple desserts is rooted in colonial apple cultivation and the long tradition of preservation through pies and tarts. Caramel as a complementary flavor became popular with the 20th century rise of confectionery syrups and soft caramels, leading to hybrid desserts like these small portable pies that balance fruit and candy flavors.
Seasonal Adaptations
In autumn, boost spice with a pinch of ground ginger and cloves, and use late-season Honeycrisp for the best texture. For winter, fold in chopped toasted pecans for crunch and swap caramel syrup for salted caramel. In summer, use tart peaches or nectarines in place of apples and reduce cooking time slightly to retain bright fruit notes. Holiday versions can include a splash of brandy or bourbon in the filling for depth.
Meal Prep Tips
Make the filling up to two days ahead and refrigerate in a shallow container so it cools quickly. Assemble raw pies, flash-freeze on a sheet pan, then store in freezer bags for quick baking later. When prepping for a crowd, lay out cookie cutters, a small spoon for portioning, and an egg-wash station to streamline assembly. Label frozen batches with the date and bake directly from frozen — add 4 to 6 minutes to the bake time as needed.
These caramel apple hand pies are the kind of recipe that invites repetition and personal tweaks. Whether you keep them simple for afternoon treats or dress them up for guests, they reward small investments of time with comfort and warmth. I hope you make them, adapt them, and share them often.
Pro Tips
Allow the cooked apple filling to cool slightly before filling to prevent soggy dough and burned hands.
Use 1 1/2 tablespoons of filling per pocket to avoid overfilling and leaking during baking.
Seal edges firmly and vent the tops with three small slits to prevent steam from bursting pockets.
This nourishing caramel apple hand pies recipe is sure to be a staple in your kitchen. Enjoy every moist, high protein slice — it is perfect for breakfast or as a wholesome snack any time.
Tags
Caramel Apple Hand Pies
This Caramel Apple Hand Pies recipe makes perfectly juicy, tender, and flavorful steak every time! Serve with potatoes and a side salad for an unforgettable dinner in under 30 minutes.
Ingredients
Filling
Dough & Finish
Instructions
Preheat and prepare baking sheets
Preheat the oven to 400 degrees Fahrenheit and line two sheet pans with parchment paper to ensure even baking and easy cleanup.
Cook the filling
In a medium skillet combine diced Honeycrisp apples, caramel syrup, dark brown sugar, butter, and allspice. Cook over medium-high, stirring frequently, until apples are fork tender, about five minutes. Remove from heat and cool for about ten minutes.
Roll and cut dough
On a lightly floured surface, roll each pie crust slightly to even thickness. Use a 3 to 4 inch cookie cutter to stamp 8 circles per crust. Indent bottom crust circles as guides for filling placement.
Fill and seal
Place 1 1/2 tablespoons of cooled filling into each bottom circle. Cover with the second crust, press to seal around filling, and use a sandwich sealer or cookie cutter. Crimp edges with a fork if necessary.
Vent and egg wash
Cut three small slits in each top for ventilation. Whisk one egg with one tablespoon heavy cream and brush the tops for a glossy, golden finish.
Bake and cool
Bake for 13 to 16 minutes until golden brown. Cool on the sheet pan briefly, then transfer to a rack to finish cooling before serving to allow the filling to set.
Last Step: Please leave a rating and comment letting us know how you liked this recipe! This helps our business to thrive and continue providing free, high-quality recipes for you.
Nutrition
Did You Make This?
Leave a comment & rating below or tag
@velvetyum on social media!
Categories:
You might also like...

Cheesy Zucchini Rollatini
Tender grilled zucchini rolled with a basil-kissed ricotta filling, nestled in marinara, and baked until the mozzarella bubbles and turns golden.

Crispy Zucchini and Squash
Golden, garlicky rounds with a deep-fried crunch made lighter in the air fryer. A fast, vitamin-packed side everyone devours.

Chicken Parmesan Meatballs
Tender chicken meatballs simmered in marinara, finished with melted mozzarella and basil for cozy, weeknight Italian comfort in every bite.
Did You Make This?
Leave a comment & rating below or tag @velvetyum on social media!
Rate This Recipe
Share This Recipe
Enjoyed this recipe? Share it with friends and family, and don't forget to leave a review!
Comments (1)
This recipe looks amazing! Can't wait to try it.
Comments are stored locally in your browser. Server comments are displayed alongside your local comments.

Hi, I'm Emma!
What's Popular

30-Minute Meals!
Join to receive our email series which contains a round-up of some of our quick and easy family favorite recipes.