
Chicken Pot Pie Casserole with Cheesy Biscuit Topping

A comforting, hearty casserole layered with a homemade cheesy biscuit topping—this Chicken Pot Pie Casserole transforms classic pot pie flavors into an easy, shareable weeknight dinner.
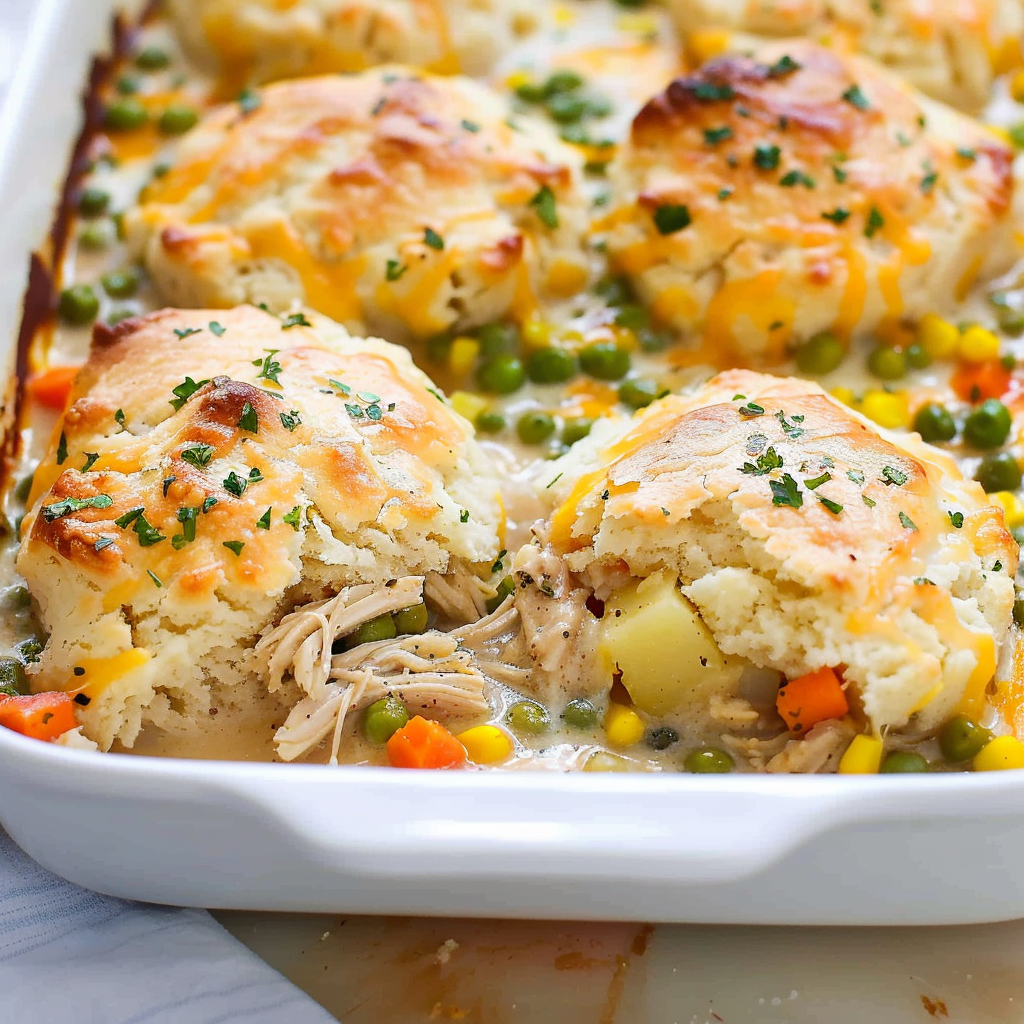
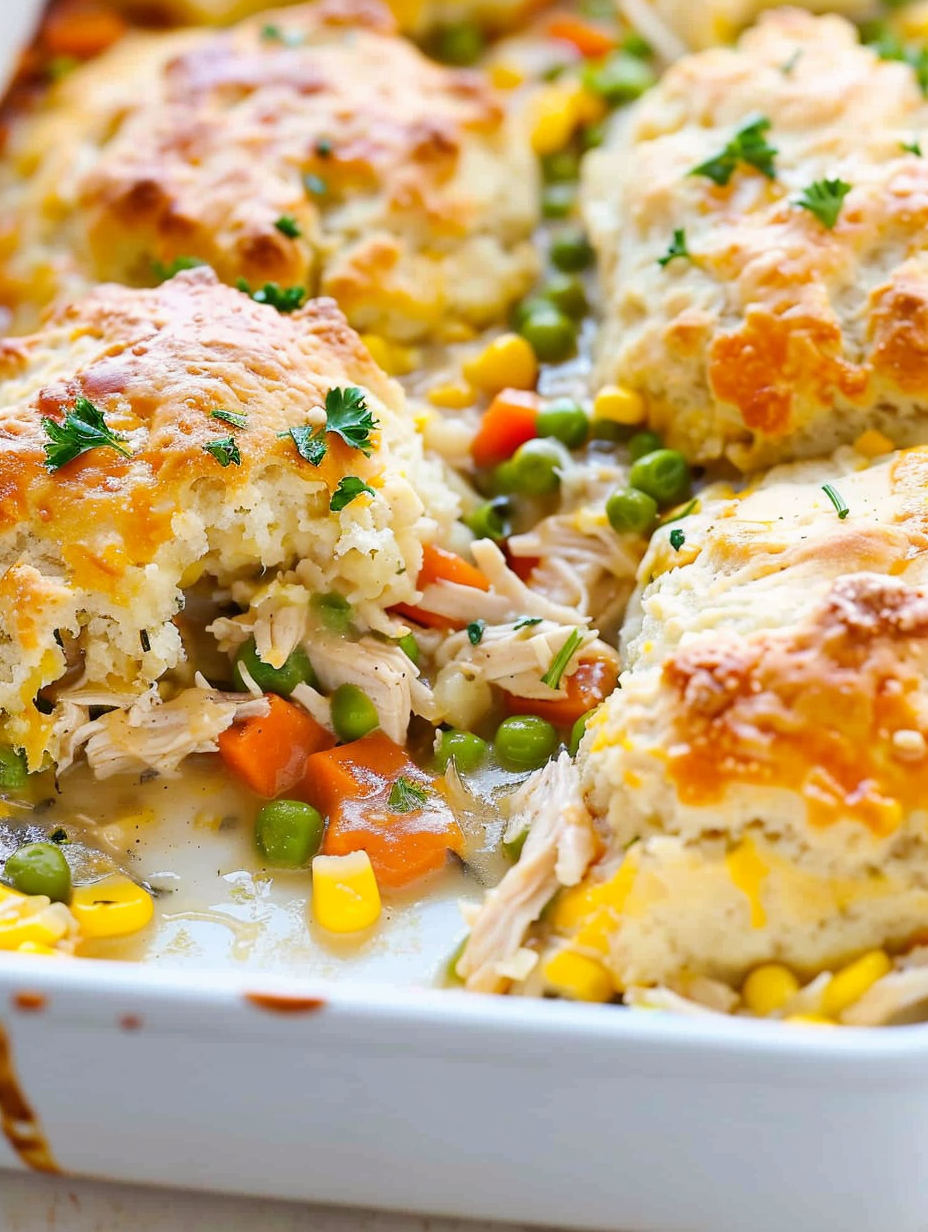
This layered Chicken Pot Pie Casserole has been one of my go-to comfort meals for cold evenings and busy weekends alike. I first developed this version on a rainy Sunday when I wanted the cozy, familiar flavors of a pot pie but needed something easier to assemble and share with a crowd. The result—tender shredded rotisserie chicken nestled in a creamy vegetable sauce, topped with rich, cheesy biscuit dollops—felt like everything I wanted in a cozy, satisfying dinner. It browns beautifully, smells amazing as it bakes, and slices into generous portions that hold up well for seconds.
What makes this dish special is the contrast: the lush, savory filling with soft potatoes, carrots, celery, and peas, and the biscuit topping that becomes slightly crisp on the outside and tender inside, studded with mild cheddar. I discovered early that chilling the biscuit batter for a short time keeps the dough from spreading too thin, giving you tall, pillowy biscuits that are perfect for scooping up the saucy filling. Every time I serve it, someone inevitably asks for the recipe—it's warm, hearty, and incredibly forgiving, which is why it’s a staple in my rotation.
Why You'll Love This Recipe
- This dish turns familiar pantry and fridge ingredients into a crowd-pleasing dinner that serves about 8 people—perfect for family gatherings or potlucks.
- It’s ready to bake in roughly 20 to 30 minutes of hands-on time if you use pre-cooked chicken and prepped vegetables, and finishes in the oven in about 30 to 35 minutes.
- The topping is a cheesy biscuit batter that you mix quickly in a bowl—no rolling or cutting required—so it’s approachable for cooks of all levels.
- Make-ahead friendly: assemble the filling in advance and top with biscuit batter right before baking, or freeze the whole casserole for later.
- Ingredient-friendly: it uses simple items like rotisserie chicken, canned corn, frozen peas, and basic dairy and pantry staples—easy to find at most stores.
In my kitchen this casserole has become shorthand for comfort. I often double the filling when guests arrive, and the leftovers reheat beautifully the next day—often tasting even better after the flavors have had time to meld. My children love tearing into the cheesy biscuit topping, and my partner always compliments the creamy sauce, so it’s become a reliable favorite.
Ingredients
- Biscuits: 1/2 cup (1 stick) unsalted butter, melted; 2 cups all-purpose flour; 1 tablespoon granulated sugar; 1 tablespoon baking powder; 1 tablespoon garlic powder; 1 teaspoon kosher salt; 1 cup whole milk at room temperature; 2 cups mild cheddar cheese, shredded. Choose a freshly shredded cheddar—pre-shredded often contains anti-caking agents that can alter melting.
- Casserole Filling: 1/4 cup (1/2 stick) unsalted butter; 1 medium yellow onion, chopped; 1 1/2 cups chopped carrots (about 2 to 3 carrots); 1 1/2 cups diced red potato (about 1 to 2 potatoes); 1 1/2 cups chopped celery (about 3 stalks); 2 teaspoons kosher salt; 1 teaspoon freshly ground black pepper; 1/4 cup all-purpose flour; 1 cup whole milk; 1 cup chicken stock; 3 cups rotisserie chicken, shredded; 1 1/2 cups frozen peas; 1 (15-ounce) can sweet corn, drained.
- Finishing: 1 large egg, beaten for an egg wash to give the biscuits a golden sheen; chopped parsley for garnish.
Instructions
Prepare the Biscuit Batter: In a large mixing bowl whisk together 2 cups all-purpose flour, 1 tablespoon granulated sugar, 1 tablespoon baking powder, 1 tablespoon garlic powder, and 1 teaspoon kosher salt until evenly combined. In a separate bowl whisk 1 cup whole milk with 1/2 cup (1 stick) melted butter. Pour the wet into the dry ingredients and stir just until combined—do not overmix. Fold in 2 cups shredded mild cheddar and then chill the batter while you prepare the filling; chilling firms the dough and prevents excessive spreading when baked. Sauté the Vegetables: Preheat the oven to 375°F and lightly spray a 9x13-inch baking dish. In a large skillet over medium heat melt 1/4 cup (1/2 stick) butter. Add chopped onion, carrots, diced red potato, and celery. Season with 2 teaspoons kosher salt and 1 teaspoon pepper. Cook, stirring occasionally, until the vegetables begin to soften, about 5 to 8 minutes; you want the potatoes to be just starting to yield but not mushy. Make the Thickened Sauce: Sprinkle 1/4 cup all-purpose flour over the cooked vegetables and stir to coat. Cook the flour for about 1 minute to eliminate a raw taste. Slowly pour in 1 cup chicken stock and 1 cup whole milk, stirring constantly to avoid lumps. Increase heat until the mixture comes to a boil, then reduce to a simmer. Continue to cook, stirring occasionally, until the sauce thickens slightly, about 3 to 4 minutes. Add Chicken and Vegetables: Stir in 3 cups shredded rotisserie chicken, 1 1/2 cups frozen peas, and the drained 15-ounce can of sweet corn. Simmer for another 2 to 3 minutes to warm through and allow the flavors to marry. Taste and adjust seasoning with salt and pepper if needed. Assemble and Top: Pour the filling into the prepared 9x13-inch baking dish and spread into an even layer. Using a large spoon or an ice cream scoop, place 8 dollops of biscuit batter (about 1/2 cup each) evenly across the surface and flatten them slightly so they sit flush with the filling. Brush the tops lightly with 1 beaten large egg to promote even browning. Bake Until Golden: Bake uncovered at 375°F for 30 to 35 minutes, or until the biscuit tops are golden brown and a skewer inserted into a biscuit comes out clean. The filling should be bubbling around the edges indicating it is fully heated. Let rest 5 to 10 minutes before serving to allow the sauce to set slightly for cleaner portions.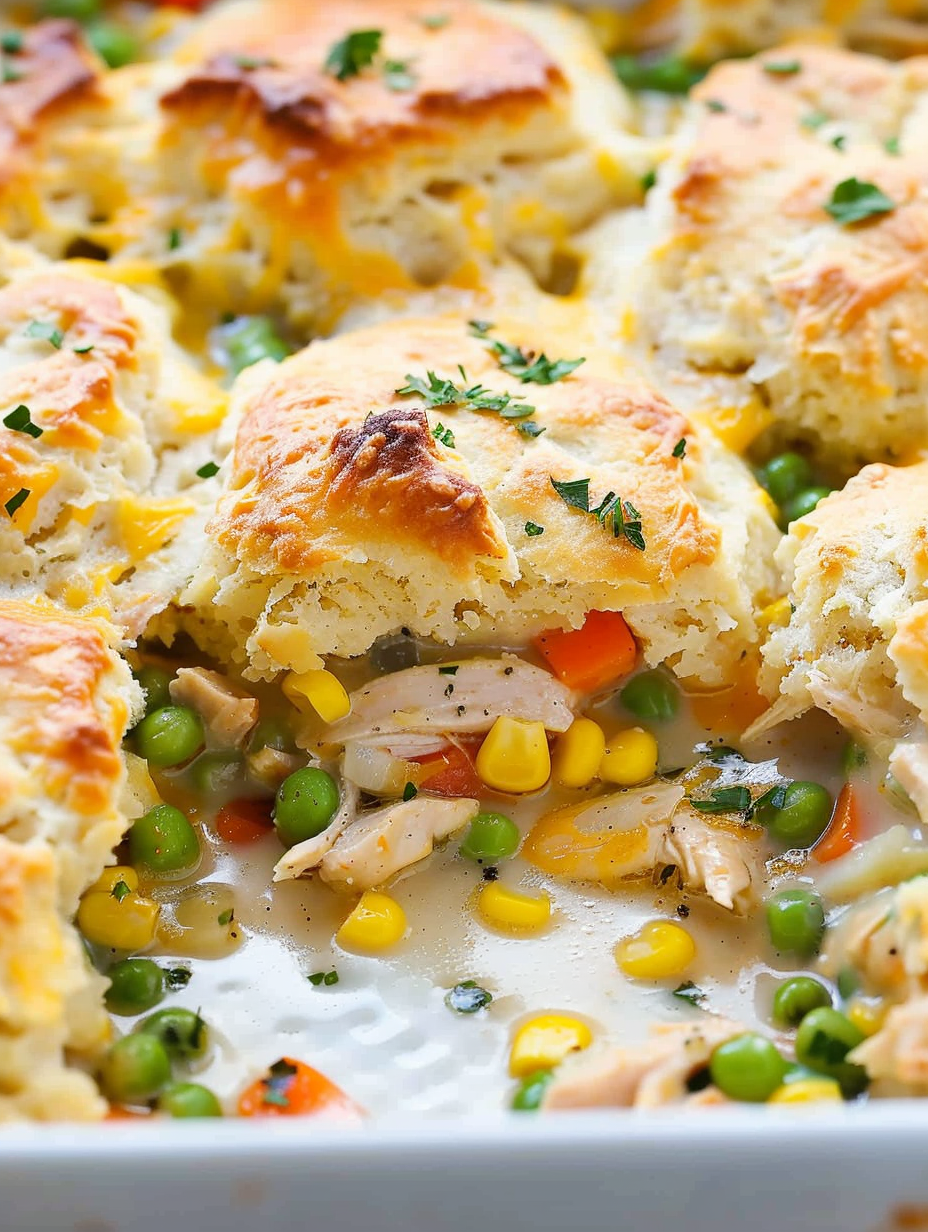
You Must Know
- This casserole freezes well for up to 3 months—assemble in a freezer-safe dish and either bake from frozen adding 15 to 20 minutes to the bake time, or thaw overnight in the refrigerator before baking.
- It’s high in protein thanks to the rotisserie chicken; each serving is hearty and satisfying for a main-course dinner.
- Store leftovers in an airtight container in the refrigerator for up to 4 days; reheat covered at 350°F until warmed through to preserve biscuit texture.
- For a thicker filling, reduce the chicken stock by 1/4 cup or simmer a few additional minutes before assembling; for a looser sauce, add 2 to 4 tablespoons extra stock or milk.
My favorite aspect of this dish is how forgiving it is—small timing or ingredient swaps don’t derail the final result. Family members often ask for the biscuits before the casserole is even plated, and I love that leftover slices pack well for lunches. It’s one of those dinners that reliably draws everyone to the table.
Storage Tips
To maximize freshness, cool the casserole to room temperature before refrigerating. Transfer leftovers into shallow, airtight containers and store in the refrigerator for up to 4 days. For longer storage, wrap the entire cooled casserole tightly with plastic wrap and foil, or place it in a freezer-safe container and freeze for up to 3 months. When reheating, thaw overnight in the refrigerator if frozen, then warm covered in a 350°F oven until heated through—this preserves biscuit texture better than microwaving. If reheating single portions, cover loosely and heat at 350°F until the center is hot to avoid drying out the biscuit tops.
Ingredient Substitutions
Swap the rotisserie chicken with leftover roasted chicken or shredded cooked turkey—both work beautifully. Use half-and-half instead of whole milk for a richer sauce, or opt for low-fat milk if you prefer lighter fare; reduce the butter slightly in that case. For a gluten-free version, use a 1:1 gluten-free all-purpose flour blend in both the biscuit batter and as the thickener, and check baking powder for a gluten-free label. If you need a dairy-free variation, substitute dairy-free butter and a plant-based milk, and choose a dairy-free shredded cheese or omit the cheese for a simple biscuit topping.
Serving Suggestions
Serve this casserole with a crisp green salad dressed in a bright vinaigrette to cut through the richness, or offer roasted Brussels sprouts and a tart cranberry relish for holiday-style meals. Garnish with chopped fresh parsley for color and a hint of freshness. For a family-style presentation, place the casserole in the center of the table with serving spoons so guests can take generous portions. Leftover slices are delicious on crusty bread or alongside steamed green beans for a fuller plate.
Seasonal Adaptations
Adjust the vegetable medley with the seasons: in spring swap peas for tender asparagus tips; in summer use fresh corn cut from the cob and cherry tomatoes for brightness; in autumn add roasted butternut squash instead of potatoes for sweetness. For a holiday twist, stir in a handful of dried cranberries and a teaspoon of fresh thyme to the filling. These small changes allow the casserole to evolve with seasonal produce while maintaining the comforting structure that makes it so reliable.
Meal Prep Tips
For efficient weeknight meal prep, cook and shred the chicken ahead of time and chop the vegetables the night before. Prepare the filling up to the point of thickening, cool, and refrigerate; when ready to bake, warm the filling slightly, transfer to the baking dish, top with chilled biscuit batter, and bake as directed. Portion leftovers into individual airtight containers for grab-and-go lunches; reheat in a toaster oven or conventional oven to restore the biscuit’s outer crispness. Using pre-shredded cheese and frozen vegetables can save additional time without sacrificing flavor.
Success Stories
I served this to friends after a community potluck and several people came back for seconds, praising the biscuit topping as a highlight. One reader mentioned doubling the filling and making a pan for a family reunion; another swapped in turkey and served it at Thanksgiving with very happy results. These anecdotes reaffirm that the recipe scales well and adapts easily to what’s on hand—attributes I value in any dependable weeknight dish.
Whether you're feeding a crowd or preparing a cozy dinner for two with generous leftovers, this Chicken Pot Pie Casserole combines classic flavors with easy technique. I hope it becomes a reliable favorite in your home as it has in mine—customize freely and make it your own.
Pro Tips
Chill biscuit batter briefly before portioning to prevent spreading and achieve taller biscuits.
Use freshly shredded cheddar for the best melting and texture; pre-shredded cheese can be drier.
Simmer the filling until it thickens slightly so the casserole isn’t runny after baking.
Brush the biscuit tops with beaten egg for an even golden color and glossy finish.
If the biscuits brown too quickly, tent the dish loosely with foil during the last 10 minutes of baking.
This nourishing chicken pot pie casserole with cheesy biscuit topping recipe is sure to be a staple in your kitchen. Enjoy every moist, high protein slice — it is perfect for breakfast or as a wholesome snack any time.
FAQs about Recipes
Can I freeze this casserole?
Yes. Assemble and cover tightly, then freeze for up to 3 months. Bake from frozen, adding 15–20 minutes, or thaw overnight and bake as directed.
How long do leftovers last?
Leftovers keep well for up to 4 days refrigerated. Reheat covered at 350°F until warmed through to preserve biscuit texture.
Tags
Chicken Pot Pie Casserole with Cheesy Biscuit Topping
This Chicken Pot Pie Casserole with Cheesy Biscuit Topping recipe makes perfectly juicy, tender, and flavorful steak every time! Serve with potatoes and a side salad for an unforgettable dinner in under 30 minutes.
Ingredients
Biscuits
Casserole
Instructions
Mix Dry Ingredients for Biscuits
Whisk together flour, sugar, baking powder, garlic powder, and salt in a large bowl until evenly combined.
Combine Wet Ingredients and Cheese
Stir melted butter into milk, pour into the dry ingredients, mix until just combined, then fold in shredded cheddar. Chill briefly.
Preheat and Prepare Dish
Preheat oven to 375°F and lightly spray a 9x13-inch baking dish with nonstick spray.
Sauté Vegetables
Melt butter in a large skillet over medium heat. Add onion, carrots, potatoes, celery, salt, and pepper; cook until vegetables soften, about 5–8 minutes.
Thicken Filling
Sprinkle flour over vegetables, cook 1 minute, then whisk in chicken stock and milk. Bring to a boil, reduce to a simmer until slightly thickened.
Add Chicken and Veggies
Stir in shredded chicken, frozen peas, and drained corn. Simmer 3–4 minutes to warm through.
Assemble and Top with Biscuits
Pour filling into prepared dish, drop 8 dollops of biscuit batter across the top, flatten slightly, and brush with beaten egg.
Bake and Rest
Bake at 375°F for 30–35 minutes until biscuit tops are golden and filling bubbles. Let rest 5–10 minutes before serving.
Last Step: Please leave a rating and comment letting us know how you liked this recipe! This helps our business to thrive and continue providing free, high-quality recipes for you.
Nutrition
Did You Make This?
Leave a comment & rating below or tag
@velvetyum on social media!
Categories:
You might also like...

Cheesy Zucchini Rollatini
Tender grilled zucchini rolled with a basil-kissed ricotta filling, nestled in marinara, and baked until the mozzarella bubbles and turns golden.

Crispy Zucchini and Squash
Golden, garlicky rounds with a deep-fried crunch made lighter in the air fryer. A fast, vitamin-packed side everyone devours.

Chicken Parmesan Meatballs
Tender chicken meatballs simmered in marinara, finished with melted mozzarella and basil for cozy, weeknight Italian comfort in every bite.
Did You Make This?
Leave a comment & rating below or tag @velvetyum on social media!
Rate This Recipe
Share This Recipe
Enjoyed this recipe? Share it with friends and family, and don't forget to leave a review!
Comments (1)
This recipe looks amazing! Can't wait to try it.
Comments are stored locally in your browser. Server comments are displayed alongside your local comments.

Hi, I'm Emma!
What's Popular

30-Minute Meals!
Join to receive our email series which contains a round-up of some of our quick and easy family favorite recipes.