30-MINUTE MEALS! Get the email series now
Velvetyum

Chocolate Cherry Thumbprint Cookies

5 from 1 vote
1 Comments
Emma
By: EmmaUpdated: Jan 15, 2026
This post may contain affiliate links. Please read our disclosure policy.

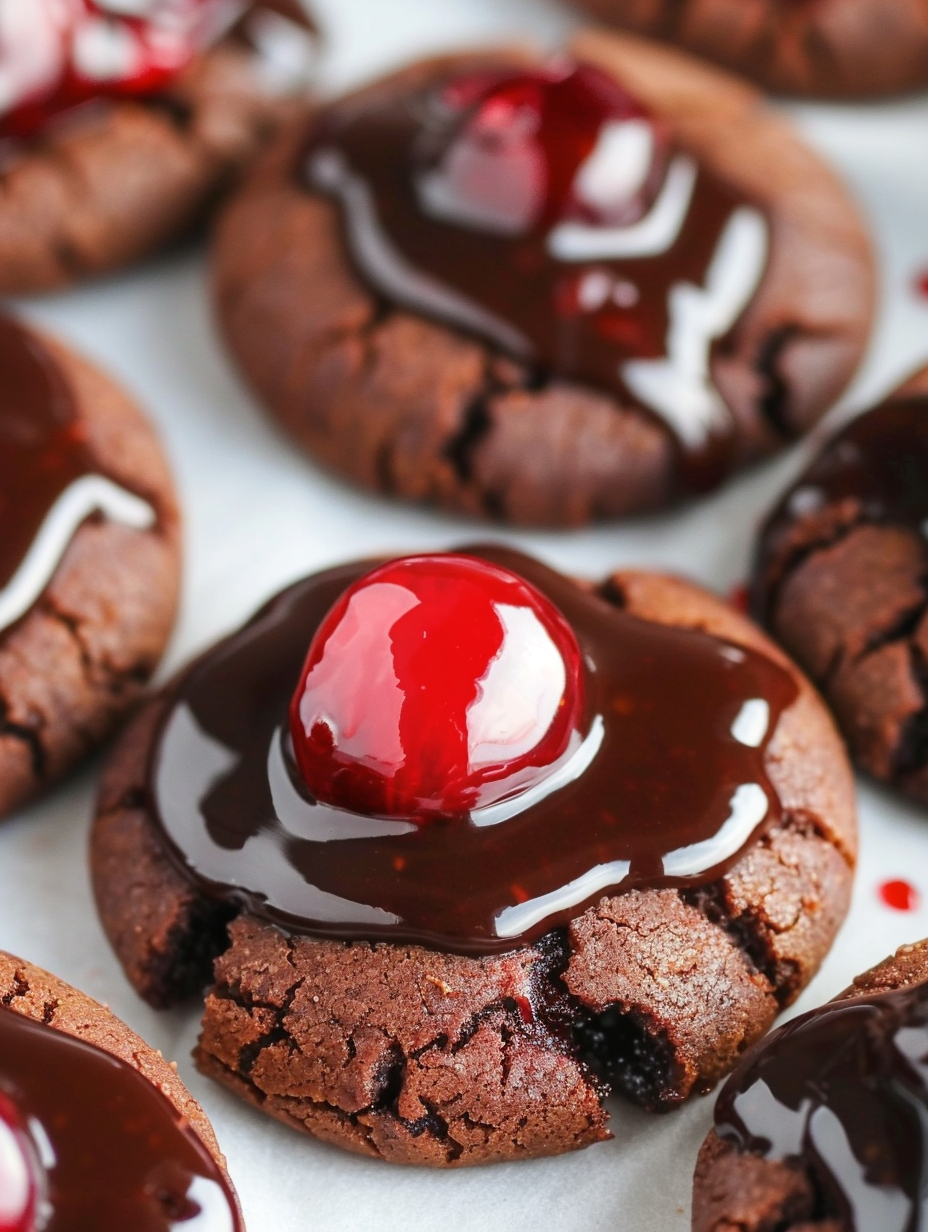
Soft, chewy chocolate cookies crowned with glossy cherry filling and a silky chocolate glaze—perfect for holidays, bake sales, or an indulgent weeknight treat.

Chocolate Cherry Thumbprint Cookies
This recipe for Chocolate Cherry Thumbprint Cookies has been a fixture in my kitchen for years. I first experimented with the combination during a rainy holiday weekend when I wanted something that felt both nostalgic and a little decadent. The initial test batch came out soft and fudgy at the edges, chewy in the center, with bright pockets of cherry that cut through the bittersweet cocoa. That contrast of textures and flavors—tender cookie, jammy cherries, and a glossy chocolate finish—made these instantly memorable. Since then they have become my go-to for cookie plates at family gatherings and a favorite when friends request something festive and easy to make. What makes these special is the balance: a cocoa-forward dough that bakes up soft rather than cakey, a spoonful of cherry pie filling that stays plump and jewel-like, and a simple chocolate glaze that dries to a shiny coating without becoming brittle. The dough is quick to bring together—15 minutes of hands-on time—and the small baking time keeps the centers tender. I love how the cookies keep for several days when stored properly, and how they travel well for potlucks. Every year someone asks for the recipe after trying one, and my niece swears they are her holiday highlight.

Why You'll Love This Recipe

  • Fast to prepare: about 15 minutes of active work and a 9-minute bake time, ideal for last-minute cookie needs or weeknight baking.
  • Uses pantry staples like all-purpose flour, cocoa, and common sugars; cherry pie filling adds a bright flourish without extra prep.
  • Textural contrast: soft, slightly chewy cookie with jammy cherry centers and a shiny chocolate glaze for a professional finish.
  • Make-ahead friendly: dough can be chilled for up to 48 hours or frozen for longer, and baked cookies store well for several days.
  • Kid-friendly assembly: forming balls and creating thumbprints is a fun, hands-on task that’s great for cooking with kids.
  • Flexible for dietary swaps: easy to adapt with dairy-free butter and egg replacers or gluten-free flour blends if needed.

In my kitchen these cookies have sparked small traditions: a platter for holiday visits, a batch for my book club, and the occasional midnight baking session when cherries are on sale. People always comment on the glossy glaze and the tender crumbs, and I enjoy the simple technique of crossing the thumbprint to create a tidy X that keeps the cherries nestled in place while baking.

Ingredients

  • All-purpose flour (1 1/2 cups): Use a standard unbleached all-purpose flour for consistent structure. Spoon into your measuring cup and level off with a knife for accuracy. King Arthur or Bob’s Red Mill work well.
  • Baking soda (1/2 teaspoon) and baking powder (1/2 teaspoon): These leaveners give a gentle lift so the cookies are tender but not cakey. Check that your baking powder is fresh for best rise.
  • Salt (1/4 teaspoon): Balances the cocoa and amplifies sweetness; use fine table salt or a light pinch of kosher salt.
  • Unsweetened cocoa powder (1/2 cup): Use Dutch-processed for a milder, deeper flavor or natural cocoa for brighter chocolate notes. Sift if it’s lumpy.
  • Butter (1/2 cup, softened): Real unsalted butter adds flavor and chew; if using salted, reduce additional salt slightly.
  • Sugar (1/2 cup) and brown sugar (1/2 cup): A mix of granulated and light brown sugar creates both crisp edges and moist chew—dark brown will add molasses depth.
  • Egg (1 large) and vanilla extract (1 teaspoon): The egg binds and adds richness; pure vanilla elevates the overall flavor profile.
  • Cherry pie filling (1 can): Canned cherry pie filling is convenient and gives consistent texture and sweetness. Look for one with whole cherries if you prefer larger fruit pieces.
  • Semi-sweet chocolate chips (1 cup), butter (2 tbsp), light corn syrup (2 tbsp), milk (3 tbsp): These create the glossy chocolate glaze. The corn syrup keeps the finish shiny without graininess.

Instructions

Combine dry ingredients: In a medium bowl, whisk together 1 1/2 cups all-purpose flour, 1/2 teaspoon baking soda, 1/2 teaspoon baking powder, 1/4 teaspoon salt, and 1/2 cup unsweetened cocoa powder until evenly distributed and free of lumps. Sifting here helps if your cocoa is compacted; this creates a uniform crumb and prevents streaks of cocoa in the dough. Cream the butter and sugars: In a large bowl or stand mixer fitted with the paddle, beat 1/2 cup softened butter with 1/2 cup granulated sugar and 1/2 cup light brown sugar until light and slightly fluffy, about 2 to 3 minutes. This aeration helps the cookies spread just enough and gives a tender texture. Add egg and vanilla: Beat in 1 large egg and 1 teaspoon vanilla extract until incorporated. Scrape the bowl to ensure even mixing; the egg adds moisture and binds the dough so the cookies hold together during baking. Mix in the dry ingredients: Gradually add the dry mixture to the wet ingredients on low speed, mixing just until combined. Avoid overmixing to keep the texture tender; stop as soon as you see no streaks of flour or cocoa. Portion and shape: Scoop rounded tablespoons of dough and roll into balls (about 24 total). Place them on a baking sheet lined with parchment paper, spacing them about 2 inches apart. For uniform cookies use a tablespoon scoop or a 1-inch cookie scoop. Create the thumbprint: Press the center of each dough ball with your thumb to make an indentation. Press again crossing the original print to form a shallow X; this helps the cherry filling sit neatly without overflowing. Keep the indent about 1/4-inch deep—too deep and the cookie may collapse. Fill and bake: Spoon approximately 3 cherries from the pie filling into each indentation, or about 1 teaspoon of filling per cookie. Bake in a preheated 350 degrees Fahrenheit oven for 9 to 10 minutes, until the edges are set but the centers remain soft. Remove from oven and let cool on the sheet for 5 minutes, then transfer to a wire rack to cool completely. Make the chocolate glaze: Combine 1 cup semi-sweet chocolate chips, 2 tablespoons butter, 2 tablespoons light corn syrup, and 3 tablespoons milk in a small heatproof bowl. Microwave in 20-second intervals, stirring between each, until smooth and glossy. Alternatively, melt gently over a double boiler. Spoon or drizzle glaze over cooled cookies and allow to set at room temperature. User provided content image 1

You Must Know

  • The cookies are best stored in an airtight container at room temperature for up to 4 days; refrigerated they keep up to a week but may lose some shine on the glaze.
  • They freeze well: freeze unbaked dough balls on a sheet, then transfer to a sealed bag for up to 3 months. Bake from frozen, adding 1–2 minutes to the bake time.
  • These contain wheat, egg, and dairy; swap to dairy-free butter and a vegan egg replacer for an allergy-friendly version, but texture will be slightly different.
  • The corn syrup in the glaze keeps it glossy and prevents crystallization; if you prefer not to use corn syrup, use 1 tablespoon extra butter and a teaspoon of light agave.

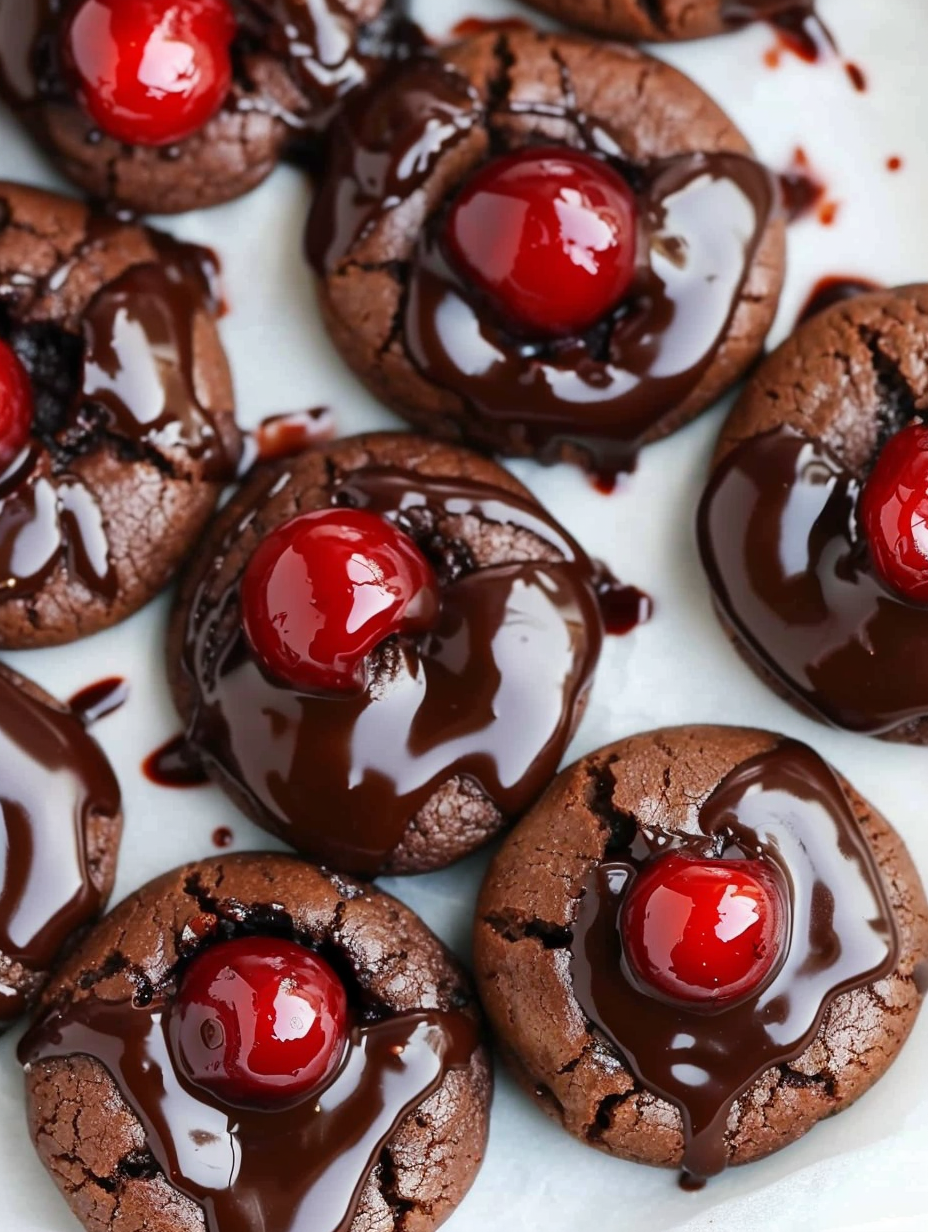
My favorite thing about these cookies is how the cherry filling remains pleasantly intact rather than turning into a syrupy puddle. One year I took a tray to a holiday exchange and someone called them the most sophisticated cookie on the table. The crossing thumbprint trick was a discovery by accident when one of my kids pressed too deeply and I tried the X shape to stabilize the fruit. It stuck.

Storage Tips

Store fully cooled cookies in an airtight container at room temperature for up to 4 days. If you stack them, place a sheet of parchment between layers to protect the glaze. For longer storage, freeze baked cookies in a single layer on a sheet until firm, then transfer to a freezer-safe container for up to 3 months. To re-crisp edges after refrigeration or freezing, warm briefly in a 300 degrees Fahrenheit oven for 3 to 5 minutes. If glazing ahead, refrigerate briefly to set the glaze before stacking.

User provided content image 2

Ingredient Substitutions

For a gluten-free option, substitute a 1-to-1 gluten-free flour blend and add a teaspoon of xanthan gum if the blend doesn’t contain it; the texture will be slightly more crumbly. Replace butter with a dairy-free stick margarine of similar fat content for dairy-free versions. If you prefer a different fruit, raspberry or apricot preserves work well but reduce the amount slightly because some preserves are thinner. For a more intense chocolate cookie, swap semi-sweet chips for bittersweet and reduce added sugar by 1 to 2 tablespoons.

Serving Suggestions

Serve these cookies warm or at room temperature on a dessert tray with powdered sugar dusted lightly for contrast. They pair beautifully with a small scoop of vanilla ice cream for a simple plated dessert, or serve alongside strong coffee or hot chocolate. For holiday presentation, garnish with a sprinkle of chopped toasted almonds or a few fresh cherries for color. They are also excellent boxed as gifts—arrange in a kraft box with tissue paper to protect the glaze.

Cultural Background

Thumbprint-style cookies trace back to Scandinavian baking traditions where jam-filled indent cookies were common at tea time and holidays. The chocolate variation builds on that heritage by introducing cocoa into the dough and a glossy chocolate finish, blending Central European chocolate traditions with classic Scandinavian shapes. Over time, thumbprints have been adapted worldwide with regional fillings such as dulce de leche in Latin cuisine or red bean paste in East Asia.

Seasonal Adaptations

In summer, swap the cherry filling for fresh macerated berries spooned into the indent and finish with a lighter glaze or dusting of sugar. For winter holidays, use spiced cranberry-orange preserves and add 1/2 teaspoon ground cinnamon to the dough. For Valentine’s Day, press a small heart-shaped candy into the chilled glaze for a playful touch. These small changes keep the recipe fresh year-round.

Meal Prep Tips

Prepare dough up to 48 hours ahead and keep wrapped in the refrigerator; chilling helps flavors meld and makes scooping neater. For busy weeks, freeze pre-portioned dough balls on a baking sheet, then stow them in a freezer bag. Bake directly from frozen, adding a minute or two to the bake time. For gatherings, make the glaze the morning of serving and drizzle just before guests arrive to maintain shine.

There is a quiet pleasure in sharing a tray of warm thumbprint cookies: the glossy finish, the way the cherry holds its shape, and the satisfaction of a simple technique yielding something special. I hope these notes help you make them confidently and adapt them to your own traditions.

Pro Tips

  • Use a level tablespoon or a small cookie scoop for uniform cookie sizes which ensures even baking.

  • Don’t overmix the dough after adding the dry ingredients to avoid a tough texture.

  • Press the thumbprint shallowly and then cross it to form an X to help the cherry filling stay centered.

  • Warm the glaze slightly before drizzling if it firms up; a few seconds in the microwave will loosen it without overheating.

This nourishing chocolate cherry thumbprint cookies recipe is sure to be a staple in your kitchen. Enjoy every moist, high protein slice — it is perfect for breakfast or as a wholesome snack any time.

FAQs about Recipes

Can I freeze the dough?

Yes. You can freeze unbaked dough balls for up to 3 months. Bake from frozen, adding 1-2 minutes to the baking time.

How long do these keep?

Store in an airtight container at room temperature for up to 4 days. For longer storage, freeze baked cookies up to 3 months.

Tags

Sweet Treatsdessertcookieschocolatecherryrecipebakingholiday
No ratings yet

Chocolate Cherry Thumbprint Cookies

This Chocolate Cherry Thumbprint Cookies recipe makes perfectly juicy, tender, and flavorful steak every time! Serve with potatoes and a side salad for an unforgettable dinner in under 30 minutes.

Servings: 24 steaks
Chocolate Cherry Thumbprint Cookies
Prep:15 minutes
Cook:9 minutes
Rest Time:10 mins
Total:24 minutes

Ingredients

Cookies

Filling

Glaze

Instructions

1

Combine dry ingredients

Whisk together flour, baking soda, baking powder, salt, and cocoa powder until evenly mixed and free of lumps.

2

Cream butter and sugars

Beat softened butter with granulated and brown sugar until light and slightly fluffy, about 2 to 3 minutes.

3

Add egg and vanilla

Beat in the large egg and vanilla extract until well incorporated, scraping the bowl as needed.

4

Incorporate dry ingredients

Gradually mix dry ingredients into the wet ingredients on low speed until just combined; avoid overmixing.

5

Shape and indent

Scoop rounded tablespoons of dough, roll into balls, place on parchment-lined sheet, and press a shallow thumbprint, crossing it to form an X.

6

Fill and bake

Place about 3 cherries (or 1 teaspoon) of cherry pie filling into each indentation and bake at 350 degrees Fahrenheit for 9 to 10 minutes until edges are set.

7

Prepare glaze and finish

Melt chocolate chips with butter, corn syrup, and milk until smooth. Drizzle or spoon over cooled cookies and let set before storing.

Last Step: Please leave a rating and comment letting us know how you liked this recipe! This helps our business to thrive and continue providing free, high-quality recipes for you.

Nutrition

Calories: 170kcal | Carbohydrates: 21g | Protein:
2g | Fat: 8g | Saturated Fat: 2g |
Polyunsaturated Fat: 2g | Monounsaturated Fat:
3g | Trans Fat: 1g | Cholesterol: 253mg | Sodium:
0mg | Potassium: 953mg | Fiber: 0g | Sugar:
0g | Vitamin A: 577IU | Vitamin C: 3mg | Calcium:
47mg | Iron: 6mg

Did You Make This?

Leave a comment & rating below or tag
@velvetyum on social media!

Chocolate Cherry Thumbprint Cookies

Categories:

Chocolate Cherry Thumbprint Cookies

Did You Make This?

Leave a comment & rating below or tag @velvetyum on social media!

Rate This Recipe

Share This Recipe

Enjoyed this recipe? Share it with friends and family, and don't forget to leave a review!

Comments (1)

Leave a Comment

0/1000 characters
Food Lover
1 day ago

This recipe looks amazing! Can't wait to try it.

Rating:

Comments are stored locally in your browser. Server comments are displayed alongside your local comments.

Family Photo

Hi, I'm Emma!

Chef and recipe creator specializing in delicious Sweet Treats cooking. Passionate about sharing easy-to-follow recipes that bring families together around the dinner table.

30-Minute Meals!

Join to receive our email series which contains a round-up of some of our quick and easy family favorite recipes.