30-MINUTE MEALS! Get the email series now

Disney Pepperoni Spring Rolls

5 from 1 vote
1 Comments
Emma
By: EmmaUpdated: Sep 29, 2025
This post may contain affiliate links. Please read our disclosure policy.

Crispy, melty pepperoni-and-cheese spring rolls inspired by the beloved Disney snack, fried golden in minutes and perfect for dipping in marinara.

Disney Pepperoni Spring Rolls
This fun, fast appetizer brings home the joy of that first bite at the spring roll cart outside Adventureland. I remember discovering the pepperoni pizza version on a warm afternoon, grabbing a basket to share, and immediately wishing we had ordered two. The crackle of the shell, the stretchy cheese, and the pepperoni spice felt like everything I love about theme park snacking wrapped into one bite. Back in my kitchen, I wanted that same crisp exterior and molten cheese pull, without a long list of ingredients or complicated steps. After a few tries, I landed on an easy approach that nails the texture and flavor. A simple cheese blend, generous layers of pepperoni, and a tight roll create a sturdy package that fries fast and cleanly in hot oil. Each roll tastes like a portable pepperoni pizza stick, perfect for dunking into marinara. Whether we are hosting movie night, watching the big game, or just craving something nostalgic, these spring rolls are my shortcut to that Disney bite, minus the long line.

Why You'll Love This Recipe

  • Fast and satisfying: ready in about 10 minutes from start to finish, with minimal prep and quick frying time.
  • Pantry-friendly: uses a handful of easy-to-find ingredients like shredded cheese, pepperoni, and store-bought spring roll wrappers.
  • Ultra crispy: hot oil at 375°F gives a blistered, golden shell that stays crunchy while the interior turns melty and gooey.
  • Kid-approved flavors: pepperoni and mozzarella-provolone taste like a pizza pocket, especially when dipped in marinara or pizza sauce.
  • Scales easily: double the batch for parties, cook two at a time to keep oil temperature steady, and serve in waves for consistent crunch.
  • Make-ahead friendly: assemble and refrigerate for a few hours, then fry to order for fresh-from-the-cart crispness.

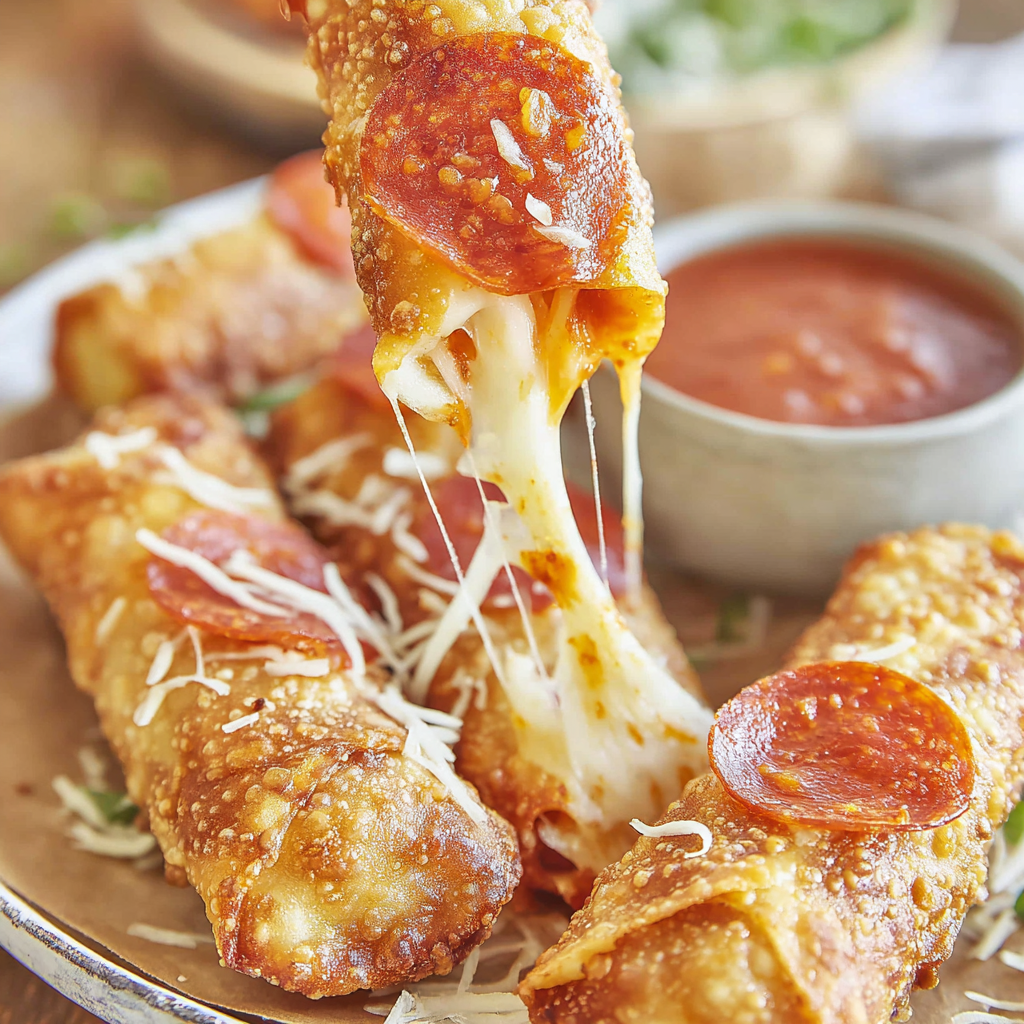
Every time I make these, my family hovers by the stove, waiting for the first batch. We set out warm marinara and a little grated Parmesan, then watch the platter disappear. The best part is the cheese pull when you break one open—pure nostalgia in a crunchy shell.

Ingredients

  • Pepperoni: Choose a classic, thin-sliced pepperoni for even layering and quick melting. Regular or mini slices both work. I like Hormel or Boar's Head for balanced spice and consistent slice thickness.
  • Mozzarella and provolone cheese: A pre-shredded blend melts creamy and stretchy. Two cups is just right for six rolls; if shredding your own, use low-moisture mozzarella with mild provolone for the best pull.
  • Spring roll wrappers: Use standard store-bought wrappers from the refrigerated section. They fry up crisp and hold their shape well when tightly rolled.
  • Vegetable oil: Neutral oil with a high smoke point—vegetable, canola, or peanut oil. Plan for about 2 inches of oil in the pan, roughly 4 cups in a 10-inch skillet.
  • Marinara or pizza sauce: Warm, smooth sauce for dipping. Rao’s or DeLallo marinara are reliably flavorful and not overly sweet.
  • Grated Parmesan (optional): A light dusting adds a salty finish, just like a pizzeria touch over hot, crispy rolls.

Instructions

Prepare your setup: Fill a circular cake pan or large shallow bowl with about 1 inch of lukewarm water. Lay out a clean work surface and keep paper towels nearby. Warm your marinara for serving. This quick setup helps you move efficiently once you start rolling and frying. Hydrate and position a wrapper: Dip one spring roll wrapper into the lukewarm water until pliable, then lay it flat on your work surface. Work with one at a time so it does not over-soften. If the surface is very wet, blot lightly to prevent slipping while you roll. Layer the filling: Spoon about 2 tablespoons of shredded cheese into the wrapper’s center, leaving about 2 inches on each end. Arrange 10 pepperoni slices in two neat rows, then add 5 more down the center. Top with about 1/8 cup additional cheese for a molten middle. Roll tightly: Fold the bottom edge up over the filling, then fold one side over, pulling snug to encase the cheese and pepperoni. Fold the opposite side over to seal the ends. Roll up firmly to create a tight cylinder. A tight roll prevents leaks and ensures even frying. Heat the oil: Pour about 2 inches of vegetable oil into a heavy skillet or Dutch oven and heat to 375°F over medium heat. Use a thermometer and adjust the heat to maintain temperature; this keeps the exterior crisp without greasy absorption. Fry to golden: Using tongs, lower two rolls into the hot oil. Fry for 2 minutes, flip, then fry the second side for another 2 minutes until deeply golden. Do not overcrowd—this preserves heat and crunch. Transfer to a paper towel-lined plate and repeat. Serve hot: Sprinkle with a little grated Parmesan if you like and serve immediately with warm marinara or pizza sauce for dipping. The shell should crackle when you bite, revealing melty cheese and savory pepperoni. Crispy pepperoni spring rolls with marinara dipping sauce

You Must Know

  • Maintain 375°F oil for best crunch; cooler oil makes soggy rolls, hotter oil can over-brown before the cheese melts.
  • Fry in small batches to avoid temperature drops and ensure even color on all sides.
  • Assemble up to 4 hours ahead and refrigerate covered; fry straight from the fridge.
  • Leftovers reheat best in a 375°F oven or air fryer for 5 to 7 minutes to restore crispness.
  • Each serving is about 312 calories, not including dipping sauce or optional Parmesan.

My favorite part is cracking one open and seeing the cheese stretch like a pizzeria slice. We once served these for a family game night and everyone paused, mid-game, to ask for the recipe after the first platter vanished. They are that kind of crowd-pleaser—simple, nostalgic, and impossible to resist hot from the pan.

Storage Tips

Cool leftover spring rolls completely on a rack so steam does not soften the crust. Store in an airtight container in the refrigerator for up to 3 days with a paper towel to absorb moisture. Reheat in a 375°F oven or air fryer until hot and crisp, 5 to 8 minutes. For freezing, place cooled rolls on a sheet pan to freeze solid, then transfer to a freezer bag for up to 2 months. Reheat from frozen at 375°F for 10 to 14 minutes, flipping once midway. Warm the marinara separately to keep the crust crisp.

Ingredient Substitutions

No mozzarella-provolone blend? Use 2 cups of low-moisture mozzarella with 1 to 2 ounces of finely grated Parmesan for extra savory flavor. Turkey pepperoni works well if you prefer a leaner option. If you like a little heat, swap in spicy pepperoni or add a pinch of crushed red pepper to the cheese. For frying oil, canola or peanut oil are great alternatives to vegetable oil. If you need a milder sauce, use a smooth pizza sauce rather than a chunky marinara for easier dipping. These swaps keep the texture consistent while adjusting flavor to taste.

Hands rolling pepperoni and cheese in a wrapper

Serving Suggestions

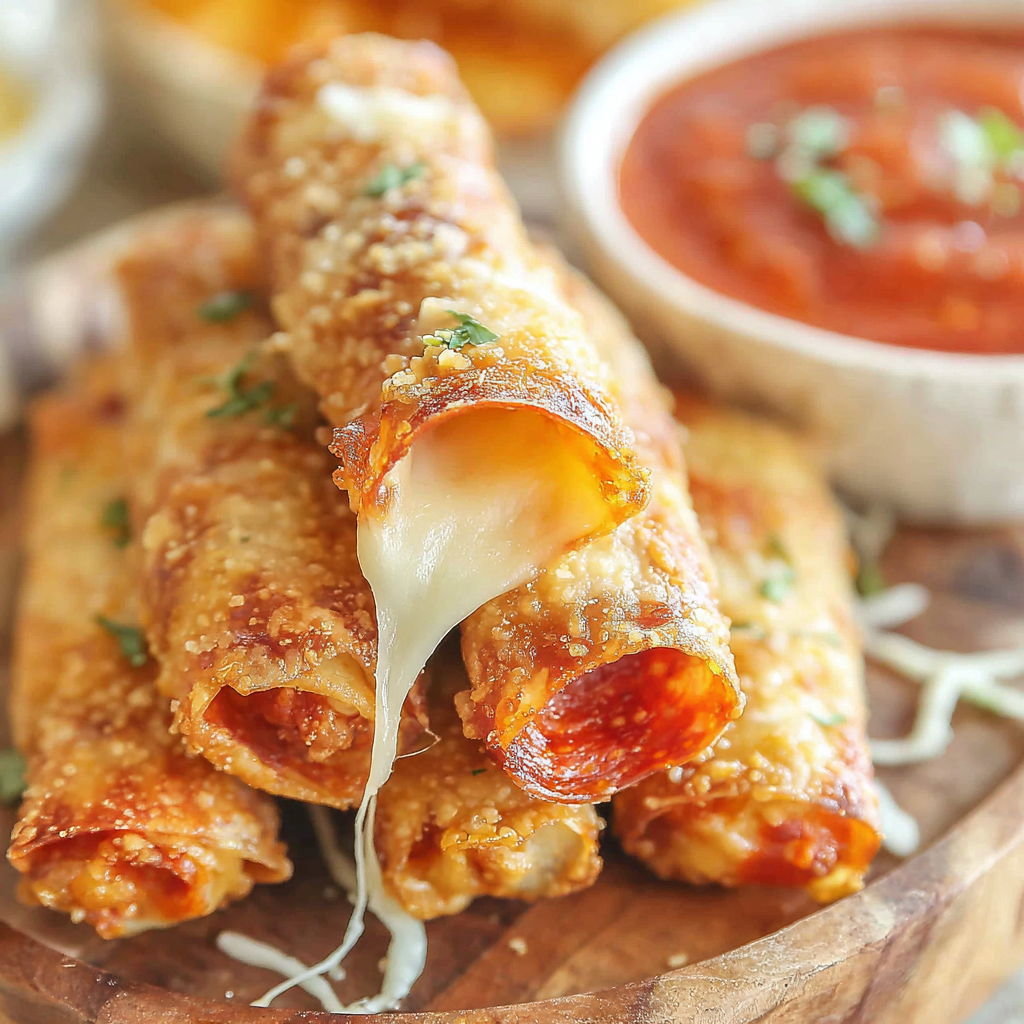
Serve these on a platter with a bowl of warm marinara in the center and sprinkle parsley or basil over the rolls for color. For a party spread, add garlic knots, a crisp chopped salad, and a simple antipasti board with olives and pepperoncini. Kids love them with ranch or a mild pizza sauce. If you are hosting game day, fry batches just before kickoff and keep them warm in a low oven on a rack to preserve the crust until serving. A final dusting of Parmesan at the table gives a pizzeria finish.

Platter of pepperoni spring rolls with dipping sauces

Cultural Background

Disney snack carts have a knack for turning simple ideas into instant classics, and the pepperoni pizza spring roll is a perfect example. It blends American pizzeria flavors with the portability and crunch of a fried roll. While traditional spring rolls often feature vegetables or pork, this playful twist channels beloved pizza-night flavors into a theme-park-friendly format. Bringing that idea home is about recreating the contrast of textures and the bold, familiar taste that makes the original so memorable.

Seasonal Adaptations

For summer, add a scattering of fresh basil inside before rolling and serve with a bright tomato-basil sauce. In fall, pair them with a roasted garlic marinara for deeper warmth. During the holidays, swap in a little diced pepperoncini for a festive kick, or serve a duo of dips like creamy Alfredo and spicy arrabbiata. For tailgates or winter game nights, fry, then wrap in foil and transport in an insulated bag, reheating briefly in an oven to re-crisp before serving.

Meal Prep Tips

Assemble the rolls up to 4 hours ahead, placing them seam-side down on a parchment-lined sheet and covering lightly with plastic wrap. When you are ready to cook, heat the oil and fry straight from the fridge. To prep for the week, cook a double batch and freeze half. Reheat individual rolls in an air fryer at 375°F for 6 to 8 minutes, or in the oven for 8 to 10 minutes on a rack. Keep small containers of marinara in the fridge so dipping is always ready.

However you share them, these pepperoni spring rolls bring a bit of theme-park magic to any table. They are quick, crunchy, and comforting, and they always disappear faster than expected. Make a batch tonight and watch the smiles appear with the very first bite.

Tags

Bites & SnacksAppetizerSnackCopycatPepperoniSpring RollsDisney
No ratings yet

Disney Pepperoni Spring Rolls

This Disney Pepperoni Spring Rolls recipe makes perfectly juicy, tender, and flavorful steak every time! Serve with potatoes and a side salad for an unforgettable dinner in under 30 minutes.

Servings: 6 steaks
Disney Pepperoni Spring Rolls
Prep:5 minutes
Cook:4 minutes
Rest Time:10 mins
Total:9 minutes

Ingredients

Spring Rolls

Instructions

1

Prepare your setup

Pour 1 inch of lukewarm water into a shallow bowl or cake pan. Warm marinara for serving and set up a clean work surface with paper towels nearby.

2

Hydrate the wrapper

Dip one spring roll wrapper into the water until pliable, then lay it flat on the work surface. Blot lightly if overly wet to prevent slipping while rolling.

3

Layer the filling

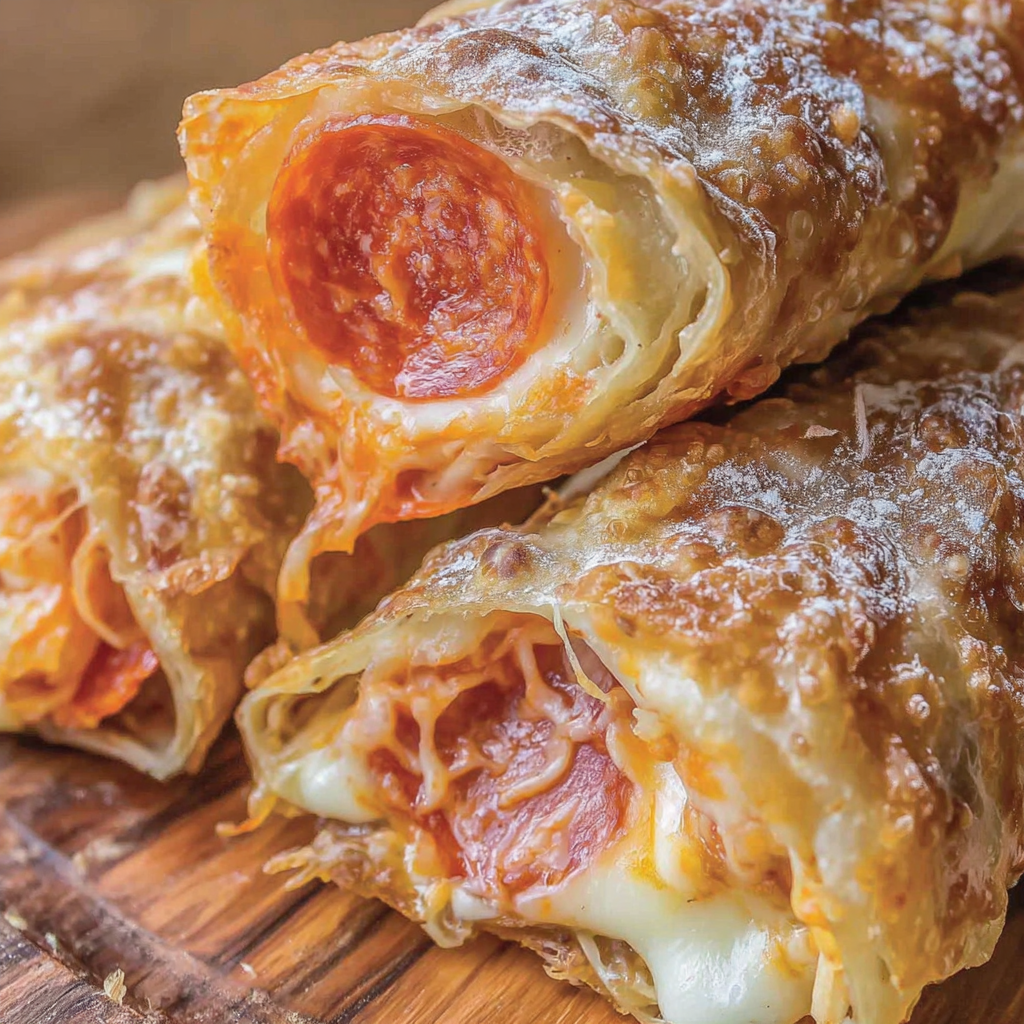
Place 2 tablespoons shredded cheese in the center, leaving 2 inches at both ends. Arrange 10 pepperoni slices over the cheese, then add 5 more down the center. Top with about 1/8 cup additional cheese.

4

Roll tightly

Fold the bottom up over the filling, fold one side in, then the other, and roll up tightly into a compact cylinder to prevent leaks during frying.

5

Heat the oil

Add about 2 inches of vegetable oil to a heavy skillet or Dutch oven. Heat to 375°F over medium heat, monitoring with a thermometer to maintain temperature.

6

Fry in batches

Using tongs, lower two rolls into the hot oil. Fry 2 minutes, flip, and fry 2 minutes more until deep golden and crisp. Drain on paper towels and repeat.

7

Serve

Dust with grated Parmesan if desired and serve hot with warm marinara or pizza sauce for dipping.

Last Step: Please leave a rating and comment letting us know how you liked this recipe! This helps our business to thrive and continue providing free, high-quality recipes for you.

Nutrition

Calories: 312kcal | Carbohydrates: 0g | Protein:
0g | Fat: 0g | Saturated Fat: 0g |
Polyunsaturated Fat: 0g | Monounsaturated Fat:
0g | Trans Fat: 1g | Cholesterol: 253mg | Sodium:
0mg | Potassium: 953mg | Fiber: 0g | Sugar:
0g | Vitamin A: 577IU | Vitamin C: 3mg | Calcium:
47mg | Iron: 6mg

Did You Make This?

Leave a comment & rating below or tag
@kitchenfunwithmy3sons on social media!

Disney Pepperoni Spring Rolls

Categories:

Disney Pepperoni Spring Rolls

Did You Make This?

Leave a comment & rating below or tag @kitchenfunwithmysons on social media!

Rate This Recipe

Share This Recipe

Enjoyed this recipe? Share it with friends and family, and don't forget to leave a review!

Comments (1)

Leave a Comment

0/1000 characters
Food Lover
1 day ago

This recipe looks amazing! Can't wait to try it.

Rating:

Comments are stored locally in your browser. Server comments are displayed alongside your local comments.

Family photo

Hi, I'm Emma!

Chef and recipe creator specializing in delicious Bites & Snacks cooking. Passionate about sharing easy-to-follow recipes that bring families together around the dinner table.

30-Minute Meals!

Join to receive our email series which contains a round-up of some of our quick and easy family favorite recipes.