
>>

Fun, less-mess apple pops dipped in dark and orange melting wafers, decorated with Halloween sprinkles—perfect for a kid-friendly holiday treat.
This Halloween chocolate covered apple pops recipe started as a simple idea to make fruit feel festive without the sticky mess of traditional caramel apples. I first tried it at a neighborhood fall festival where parents wanted a tidy, portable sweet that still tasted seasonal. By swapping caramel for melting wafers and slicing apples into easy-to-hold pops, this version became our household favorite for school parties and after-school snacks. The interplay of crisp Granny Smith apple, a thin shell of chocolate, and bright orange drizzle is bright and playful, and it keeps little fingers clean while still delivering the holiday crunch.
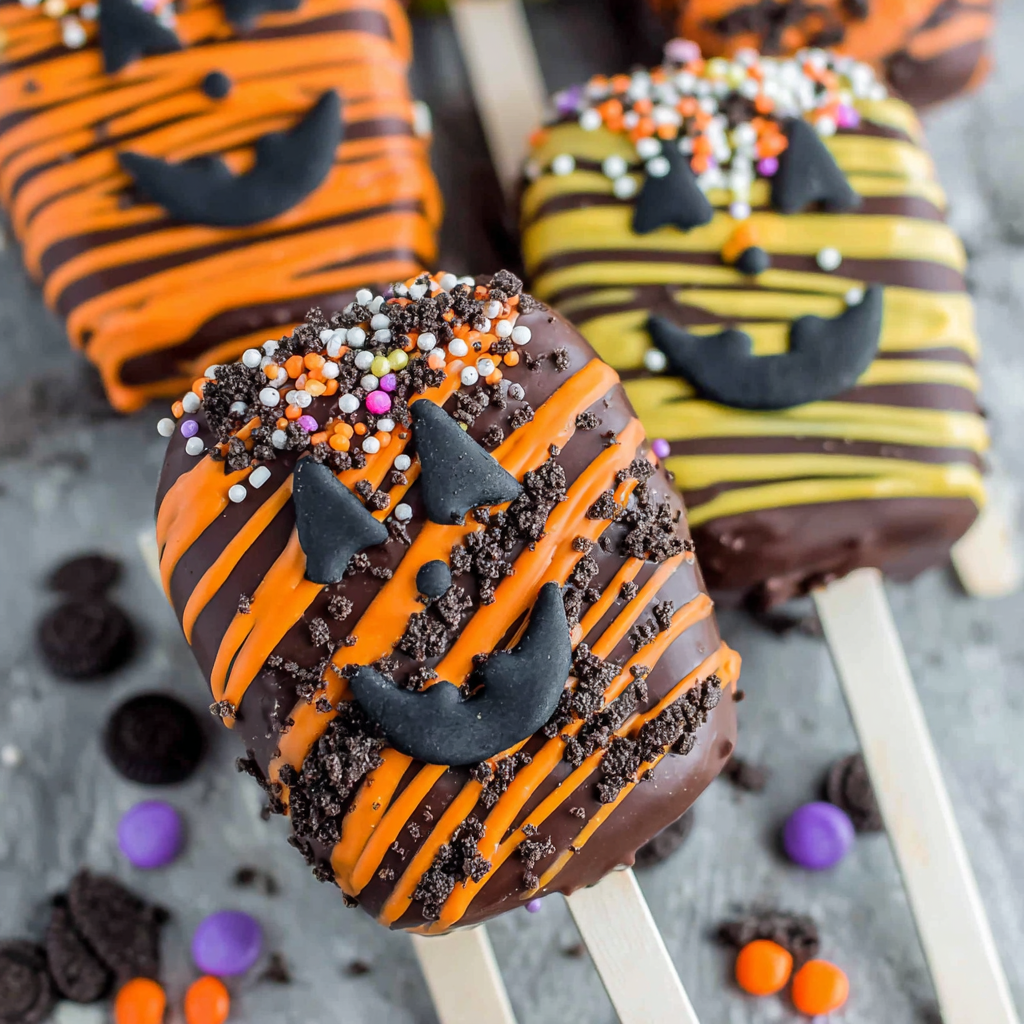
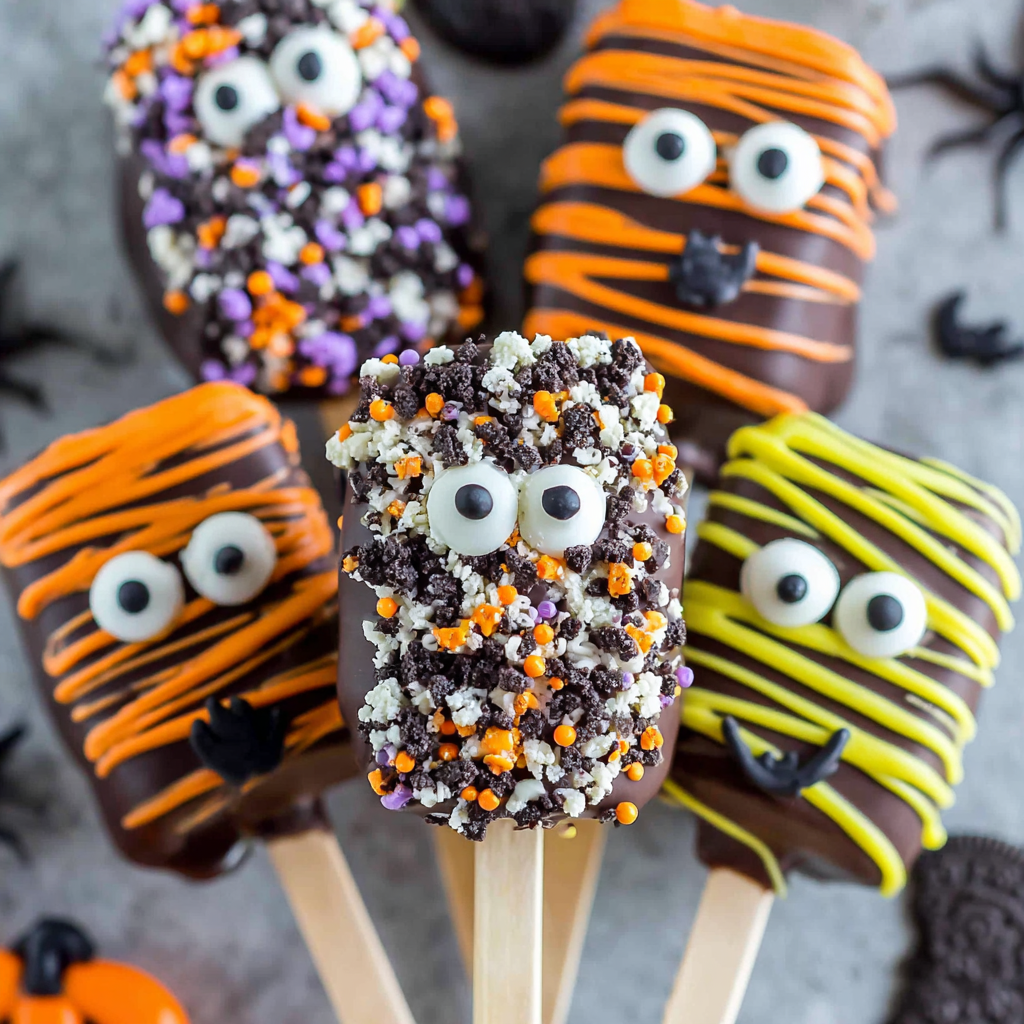
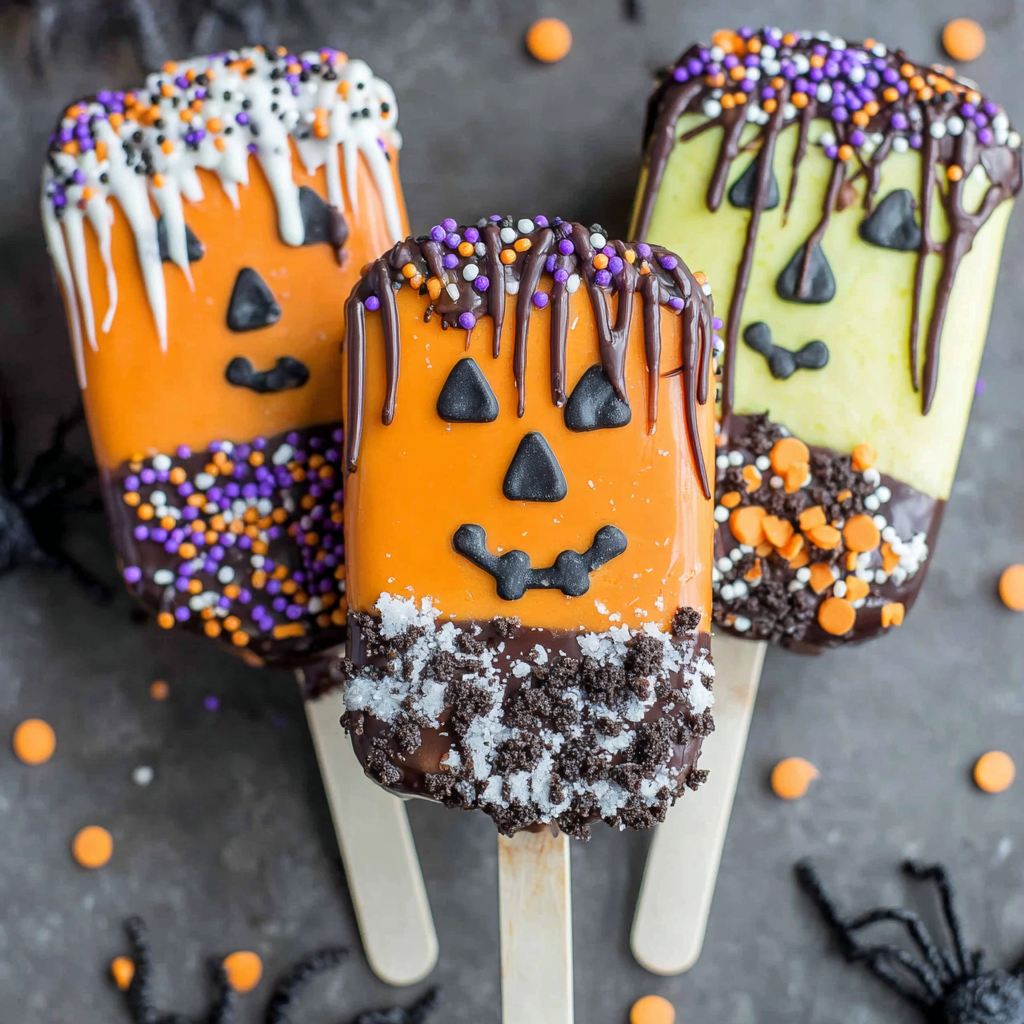
I discovered this method when I needed a dessert that could be assembled quickly but also look impressive. Cutting each apple into quarter-slices and inserting a popsicle stick makes the apples behave well under a chocolate coating. The dark cocoa wafers deliver a rich contrast to the tart apple, while the orange wafers bring visual pep and a sweet vanilla flavor that kids adore. Decorating time becomes a craft; kids can choose sprinkles and cookie crumbs to create ghosts, jack-o-lantern faces, or whimsical monsters. When the pops are finished, they set quickly on parchment, and the result is festive, not messy.
In my first round of these pops, my niece lined up every decorated apple on a tray and announced them by name. Seeing how proud she was—each one uniquely decorated—made me realize how much joy a small food craft can bring. Guests comment on the crisp bite and pretty presentation and often ask for the simple technique so they can recreate it at home.
One of my favorite aspects is seeing how inventive kids get with decorations. At a recent school party, a group of five-year-olds created a small apple graveyard using cookie-crumb soil and candy eyes. Those playful presentations always steal the show and make these pops more than just a treat—they become a shared activity and memory.
Store finished pops on a flat tray covered loosely with plastic wrap at room temperature for up to 24 hours to preserve the crispness of the apple. For longer storage, arrange pops in a single layer on a baking sheet and freeze until firm; then pack them into an airtight container separated by parchment layers. When you are ready to serve frozen pops, thaw them for 20 minutes at room temperature to avoid condensation forming on the coating. Avoid stacking pops while setting to prevent smudges and broken coatings.
If you cannot find melting wafers, use chocolate chips tempered gently with a small amount of coconut oil to thin, but expect a softer shell. White candy melts can be tinted with oil-based coloring for different themes. For a nutty twist, sprinkle finely chopped toasted almonds or crushed graham crackers instead of sprinkles. If you need a dairy-free option, select dairy-free chocolate melts labeled vegan and check sprinkles for cross-contamination warnings. Each swap affects texture and sweetness, so test a single pop before coating the whole batch.
Arrange pops upright in a decorated jar filled with dry rice or candy corn for a festive display. Pair them with hot apple cider on a cool evening, or set up a decorating station where guests dip and sprinkle their own. For a party platter, alternate dark-coated and orange-coated pops, and add small bowls of extra sprinkles, mini chocolate chips, and crushed cookies for guests to customize. These are great as grab-and-go classroom treats or as a centerpiece for a Halloween dessert table.
For autumn harvest parties, swap orange wafers for caramel-colored wafers and use crushed pecans as a topping for a more rustic flavor. At winter holidays, use red and green melts and top with crushed candy canes or toasted coconut. For Valentine’s Day, dip in pink and red melts and add heart-shaped sprinkles. The basic technique adapts easily to color schemes and holiday motifs, so you can reuse this method year-round.
Prep apple slices and insert sticks the day before for busy event days, keeping slices in an airtight container with a splash of lemon juice to prevent browning. Melt wafers shortly before assembly and work in batches of 8 to 10 pops so the chocolate stays fluid for smooth dipping. Keep a damp cloth nearby to wipe hands and bowls, and use a clean spoon for drizzle work. Label containers with assembly date if storing in freezer or refrigerator for clarity.
These Halloween apple pops are simple, customizable, and excellent for bringing people together. They combine practical party efficiency with playful presentation, and I hope you enjoy making them as much as we do at Velvetyum.com. Happy decorating and have a spooktacular holiday!
Dry apples thoroughly after washing to help chocolate adhere evenly.
Stir the wafers frequently while melting to avoid scorching; use 30-second increments in the microwave.
Work in small batches so the melted wafers remain fluid for smooth dipping.
Use parchment or a wire rack to catch drips and ensure clean bottoms on each pop.
This nourishing halloween chocolate covered apple pops recipe is sure to be a staple in your kitchen. Enjoy every moist, high protein slice — it is perfect for breakfast or as a wholesome snack any time.
Yes. For fastest setting, place the tray in the refrigerator for 5 to 10 minutes but avoid long refrigeration which can cause condensation.
Flash-freeze in a single layer, then transfer to an airtight container for up to three months.
Choose sturdy popsicle sticks and slice apples slightly under 1/2 inch thick so the stick holds without splitting the slice.
This Halloween Chocolate Covered Apple Pops recipe makes perfectly juicy, tender, and flavorful steak every time! Serve with potatoes and a side salad for an unforgettable dinner in under 30 minutes.
Wash apples thoroughly, pat dry, and cut each apple into four slices avoiding the core. Aim for slightly under 1/2 inch thickness so the popsicle stick can be inserted without splitting the slice.
Push a popsicle stick into the center of each apple slice about halfway through. Ensure the stick is secure and the slice does not crack; discard split slices and replace with a new slice.
Place dark cocoa and orange wafers in separate microwave-safe bowls. Microwave on medium power for 2 minutes, stir, then continue in 30-second increments until smooth. Stir between each increment to avoid scorching.
Dip apple pops into the dark cocoa wafers so each long side is coated. Use a spoon to drizzle orange wafers over the wet cocoa coating. Immediately add sprinkles and set on parchment or a wire rack.
Dip the remaining apple pops into the orange wafers, then drizzle with the dark cocoa wafers. Decorate with sprinkles while the coating is still wet and place on the prepared sheet.
Allow the coating to set at room temperature for 10 to 15 minutes or chill briefly to speed setting. Serve once coatings are firm and enjoy.
Last Step: Please leave a rating and comment letting us know how you liked this recipe! This helps our business to thrive and continue providing free, high-quality recipes for you.
Leave a comment & rating below or tag
@velvetyum on social media!

Tender grilled zucchini rolled with a basil-kissed ricotta filling, nestled in marinara, and baked until the mozzarella bubbles and turns golden.

Golden, garlicky rounds with a deep-fried crunch made lighter in the air fryer. A fast, vitamin-packed side everyone devours.

Tender chicken meatballs simmered in marinara, finished with melted mozzarella and basil for cozy, weeknight Italian comfort in every bite.
Leave a comment & rating below or tag @velvetyum on social media!
Enjoyed this recipe? Share it with friends and family, and don't forget to leave a review!
This recipe looks amazing! Can't wait to try it.
Comments are stored locally in your browser. Server comments are displayed alongside your local comments.

Join to receive our email series which contains a round-up of some of our quick and easy family favorite recipes.
