
Martha Washington Candies

Old-fashioned Martha Washington candies: coconut, pecans and cherries coated in chocolate — an easy, nostalgic holiday treat perfect for gifting and cookie trays.
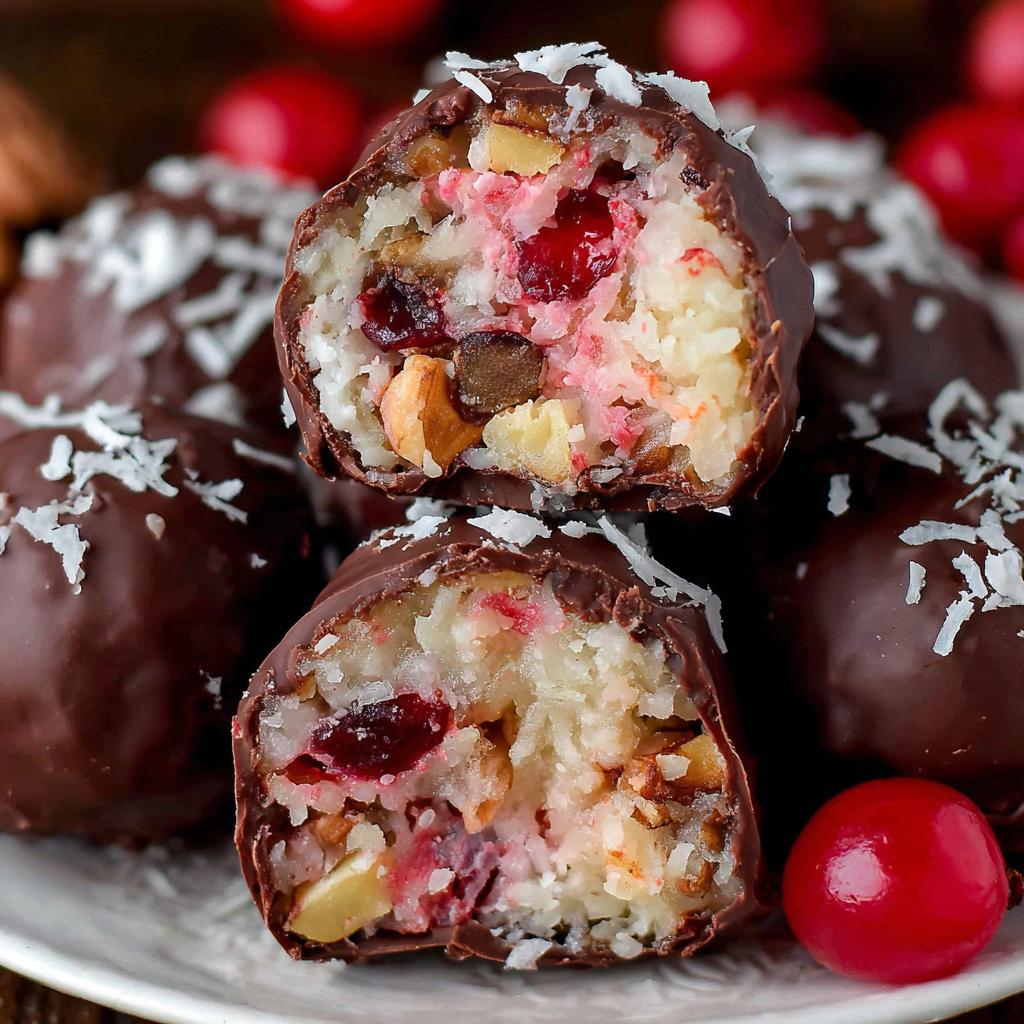
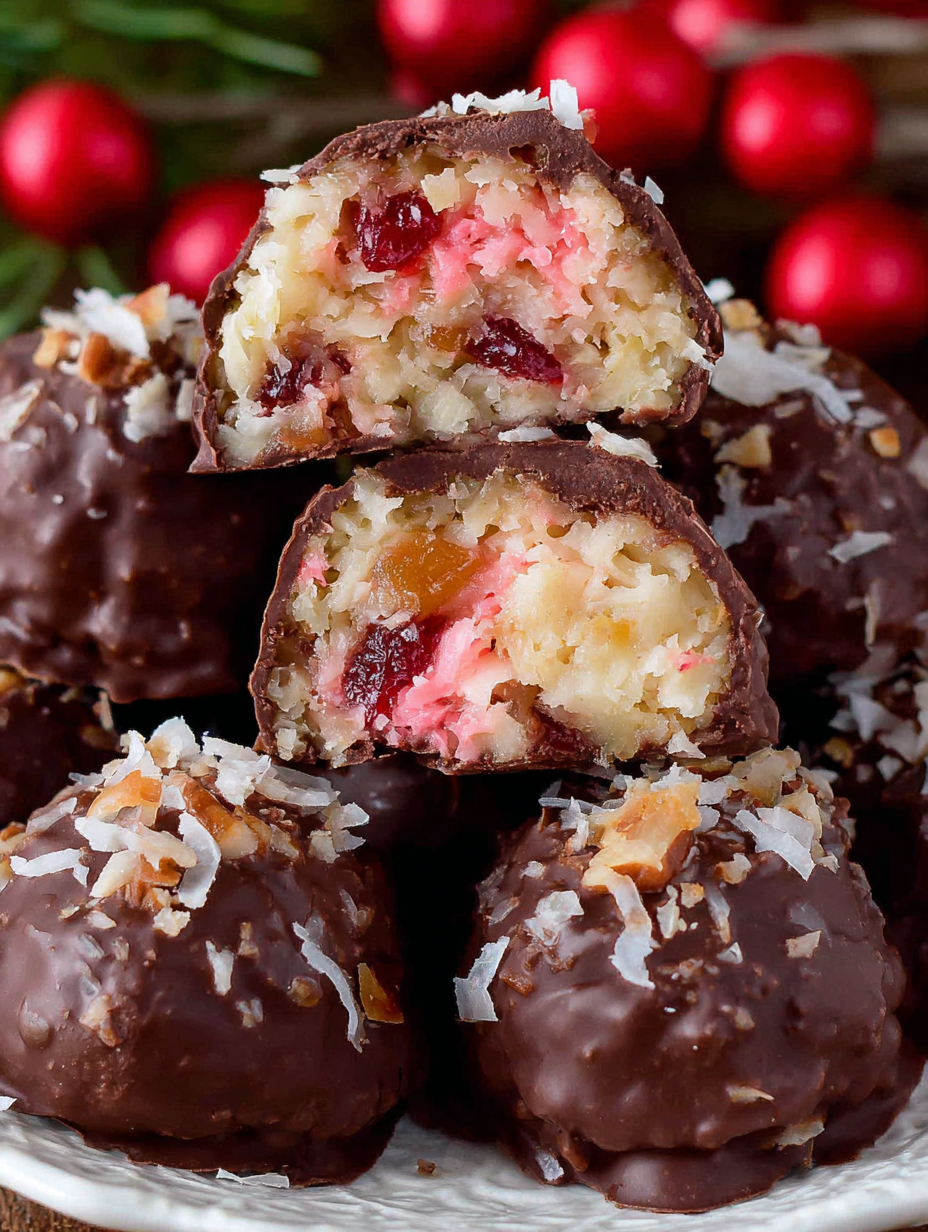
This Martha Washington candy has been a holiday staple in my kitchen for as long as I can remember. I first tasted a version of these at a neighbor's cookie swap during a brisk December evening; the scent of coconut and toasted pecans filled the house, and the glossy chocolate coating made each bite feel like a small, festive indulgence. I adapted the recipe over the years to match my family's preferences—more pecans, just a touch less sugar, and a careful drying step for the cherries so the texture stays perfect. These candies are crunchy, chewy and luxuriously chocolatey all at once.
What makes this version special is the balance of textures and flavors: sweetened shredded coconut lends chew and tropical warmth, chopped pecans add toasted crunch, and maraschino cherries bring little pockets of bright, fruity sweetness. Enrobing the chilled filling in a thin, even layer of candy coating creates a crisp shell that gives way to a dense, fudgy center. They're quick to assemble and make an impressive addition to a cookie tray, and because they store well at room temperature, they're ideal for gifting during the holidays.
Why You'll Love This Recipe
- Hands-on prep is short — about 15 minutes to mix; chilling does the slow work, so you can get other holiday tasks done while the filling firms up.
- Uses pantry-friendly ingredients like powdered sugar and sweetened condensed milk alongside easy-to-find items: shredded coconut, pecans and maraschino cherries.
- Perfect for make-ahead gifting: prepare the centers in advance and dip the day you need them for a fresh, glossy finish.
- Impressive on a cookie tray even though the technique is straightforward — a great balance of elegant presentation and old-fashioned comfort.
- Kid-friendly assembly: forming balls and dipping is a fun activity for small helpers, while adults can handle the dipping station.
- Customizable: swap nuts, add orange zest, or use different coatings to suit dietary needs or flavor preferences.
When I made these for the first time for my sister's holiday open house, people kept coming back for more. A co-worker once told me the texture reminded her of a vintage candy her grandmother used to make — dense and tender with a satisfying crunch. Over the years I've learned small tricks, like blotting cherries dry and chilling thoroughly, which transform this from good to reliably excellent every time.
Ingredients
- Butter (1 cup, melted): Use unsalted butter and melt it gently; it binds the filling and adds a creamy richness. I often use Plugra or Kerrygold for a slightly higher butterfat content that gives a silkier mouthfeel.
- Powdered sugar (1 pound): Also called confectioners' sugar — it firms the center and sweetens without grittiness. Sift once if it has lumps from storage.
- Vanilla extract (1 tablespoon): Pure vanilla adds depth. I recommend Nielsen-Massey or McCormick Pure for consistent flavor.
- Shredded coconut (14 ounces, sweetened): Sweetened, finely shredded coconut provides chew and moisture. If you only find flaked coconut, pulse it briefly in a food processor.
- Sweetened condensed milk (14 ounces): This is the glue: dense, sweet and pivotal for the fudgy texture. Use a good brand like Eagle Brand for predictable sweetness and consistency.
- Maraschino cherries (10 ounces, drained and chopped): Chop small and blot on paper towels so they don't add excess liquid. This keeps the centers from getting soggy.
- Pecans (3 cups, finely chopped): Toast them lightly for added aroma and crunch. Pecans are traditional, but walnuts or almonds work too.
- Candy coating (16 ounces): Use melting wafers or almond bark in milk or semisweet for the classic look. Brands like Ghirardelli or Wilton melting wafers give a shiny, forgiving finish.
Instructions
Prepare the cherries: Drain the maraschino cherries and pat them very dry with paper towels. Chop into pieces roughly 1/4 inch or smaller; the drier and smaller the pieces, the less moisture they will introduce to the filling, which helps the centers set firmly. Mix the filling: In a large bowl combine melted butter, powdered sugar, vanilla, shredded coconut, sweetened condensed milk, chopped cherries and the chopped pecans. Stir until uniformly combined; the texture should be dense and slightly sticky. Taste and adjust—if you want a stronger vanilla or more nuts, now is the time. Chill the mixture: Cover the bowl and refrigerate the filling for at least two hours, preferably longer. Cold filling firms up and is much easier to shape, and it helps the coating set quickly without seeping through. Form the balls: Using a small scoop or your hands, form centers about the size of a walnut (roughly 1 inch). Place them on a parchment-lined baking sheet and chill for about 20 minutes to set the shape before dipping. Melt the coating and dip: Melt the candy coating according to package directions, keeping it smooth and warm but not too hot. Dip each chilled ball, tapping off excess and returning to parchment to set. Work quickly so the filling stays cold and the coating remains glossy. Set and store: Allow candies to set on the baking sheet until the coating is firm. Trim any large drips if necessary. Store in an airtight container at room temperature for up to two weeks.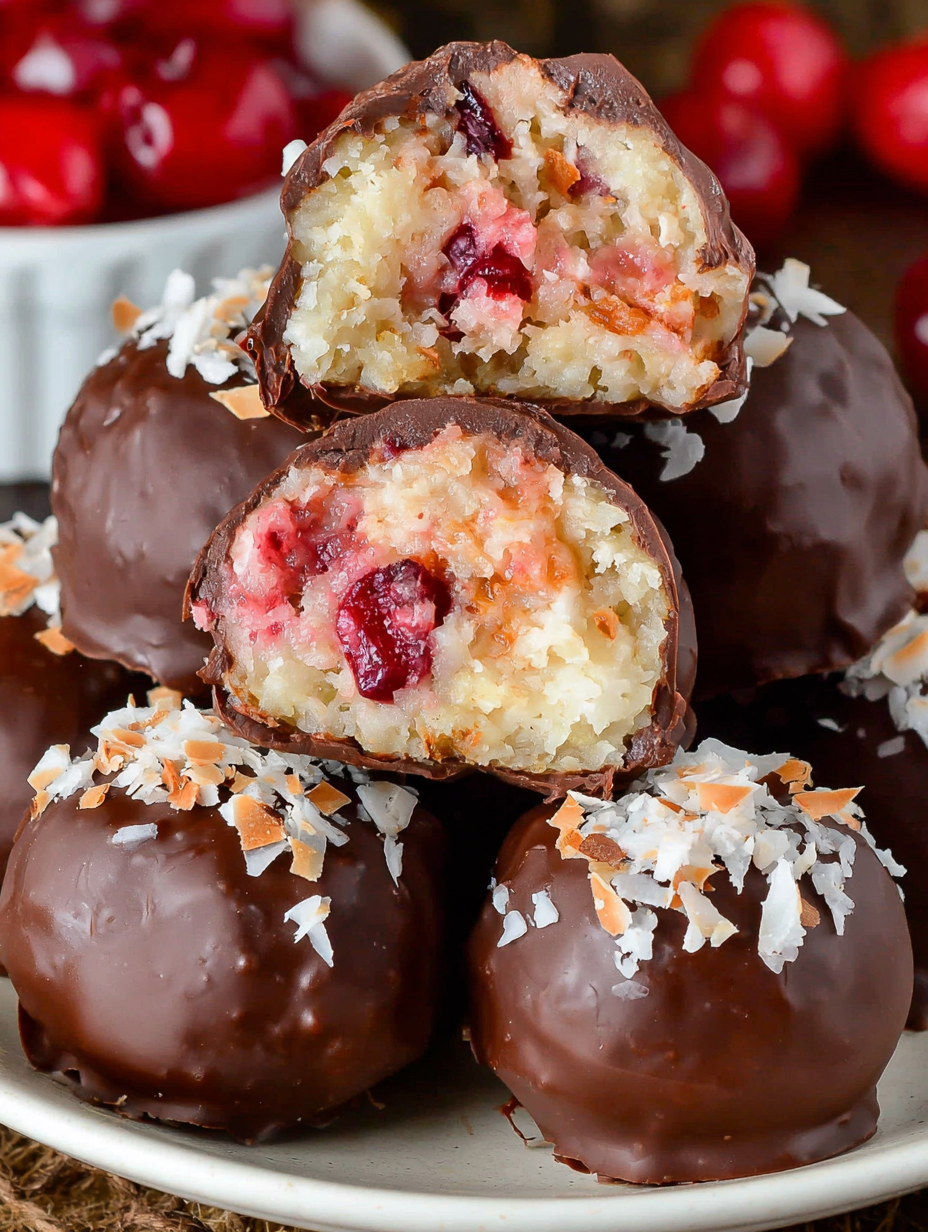
You Must Know
- These candies store well at room temperature in an airtight container for up to two weeks; they also freeze nicely for up to three months when wrapped tightly.
- Because of the sweetened condensed milk and powdered sugar, these are relatively high in sugar and calories — expect about 200 kcal per piece and roughly 22 g carbohydrate.
- To avoid a soft center, blot cherries very dry and chill the filling thoroughly before shaping and dipping.
- Use high-quality candy coating or chocolate: a tempered chocolate will give the best snap and shine, while melting wafers are most forgiving for beginners.
My favorite thing about these is how a single tray can span generations at a holiday gathering—grandparents savoring the familiar flavors and kids marveling at the chocolate shell. The combination of textures always gets compliments: a crisp exterior, chewy coconut, crunchy nuts and bright cherry notes. It’s a simple homemade candy that carries a lot of nostalgia.
Storage Tips
Store the candies in a single layer or separated with parchment to prevent sticking. An airtight tin or container at cool room temperature (about 60 to 70°F) preserves texture and keeps the coating glossy. If you need to refrigerate because your home is warm, allow candies to come to room temperature before serving to avoid condensation on the coating. For longer storage, freeze in a rigid container layered with parchment for up to three months; thaw in the refrigerator overnight and then bring to room temperature before serving.
Ingredient Substitutions
If you prefer a different nut, swap pecans for toasted walnuts or finely chopped almonds using a 1:1 ratio. For a less-sweet coconut note, use unsweetened shredded coconut and reduce the powdered sugar by about 1/4 cup, though texture will change slightly. To make them dairy-free, replace butter with a vegan buttery spread and use dairy-free sweetened condensed milk and coconut-based melting wafers. Using dark chocolate instead of candy coating creates a more bitter contrast to the sweet center, which some people prefer.
Serving Suggestions
Arrange on a decorative platter or nestle them in small candy cups for a classic presentation. Pair with strong coffee or a mellow black tea to balance the sweetness; for holiday gatherings, serve alongside spiced mulled wine or a citrusy sparkling beverage. Garnish with a light dusting of finely chopped pecans or a sliver of candied orange peel for color. These make beautiful homemade gifts when tied in a box with a ribbon.
Cultural Background
The name evokes an old-fashioned American confection tradition, where hand-dipped candies were common homemade treats during the holidays. Martha Washington confections reference a vintage style of candy popular in the 19th and early 20th centuries, composed of nutty, coconut-rich centers covered in chocolate. These candies reflect the era's love for dense, take-a-bite sweets that were often presented as small luxuries at home or exchanged as gifts between neighbors during the holiday season.
Seasonal Adaptations
For winter holidays add a teaspoon of orange zest to the filling for a bright twist, or stir in 1/4 teaspoon ground cinnamon and a pinch of nutmeg for warm spice. In summer, use glacé cherries or even dried cherries rehydrated briefly for a less syrupy option and switch to white chocolate coating for a lighter look. For Valentine’s Day, tint a portion of the coating pink or drizzle contrasting chocolate over each piece for a festive finish.
Meal Prep Tips
Make the filling two to three days ahead and keep it chilled; shape and dip the day you plan to serve for the freshest coating appearance. Use a small cookie scoop for uniform sizes and freeze briefly to speed the setting process before dipping. Keep a dedicated dipping station with melted coating in a shallow vessel, cooling rack over parchment to catch drips, and a tray for chilled centers. This assembly-line approach speeds production for large batches.
These Martha Washington candies are a timeless holiday favorite—simple to make, endlessly adaptable, and a true crowd-pleaser. I hope you find as much joy making and sharing them as my family has for years. Happy dipping!
Pro Tips
Blot maraschino cherries thoroughly on paper towels to remove excess syrup and prevent soggy centers.
Chill the filling for at least two hours; the colder the centers, the cleaner the chocolate coating and the quicker it sets.
Toast pecans lightly on 350°F for 6–8 minutes for deeper aroma; cool before chopping to maintain crispness.
Use a small cookie scoop or scale for uniform candy sizes to ensure even setting and consistent presentation.
Tap off excess coating carefully to avoid pooling at the bottom; trim large drips once set for tidy edges.
This nourishing martha washington candies recipe is sure to be a staple in your kitchen. Enjoy every moist, high protein slice — it is perfect for breakfast or as a wholesome snack any time.
FAQs about Recipes
How long do these candies keep?
Yes. Store in an airtight container at room temperature for up to two weeks or freeze for up to three months. Thaw in refrigerator overnight before serving.
Why did my centers become too soft?
Blot the cherries thoroughly on paper towels and chill the filling well. Work with a cold center and avoid overheating the coating to prevent the filling from softening.
Tags
Martha Washington Candies
This Martha Washington Candies recipe makes perfectly juicy, tender, and flavorful steak every time! Serve with potatoes and a side salad for an unforgettable dinner in under 30 minutes.
Ingredients
Filling
Coating
Instructions
Prepare the cherries
Drain maraschino cherries and place on paper towels; blot thoroughly to remove syrup and chop into small pieces to minimize added moisture.
Combine filling ingredients
In a large bowl, mix melted butter, powdered sugar, vanilla extract, shredded coconut, sweetened condensed milk, chopped cherries and chopped pecans until uniformly combined.
Chill the mixture
Cover and refrigerate the filling for at least two hours; cold filling firms up and makes shaping much easier.
Form balls
Scoop or roll filling into 1-inch balls (about the size of a walnut). Place on a parchment-lined sheet and chill for about 20 minutes to set.
Melt coating and dip
Melt candy coating according to package directions. Dip chilled balls, tapping off excess coating and placing on parchment to set; work quickly to keep centers cold.
Set and store
Allow coating to fully set, trim any large drips if desired, and store candies in an airtight container at room temperature for up to two weeks.
Last Step: Please leave a rating and comment letting us know how you liked this recipe! This helps our business to thrive and continue providing free, high-quality recipes for you.
Nutrition
Did You Make This?
Leave a comment & rating below or tag
@velvetyum on social media!
Categories:
You might also like...

Cheesy Zucchini Rollatini
Tender grilled zucchini rolled with a basil-kissed ricotta filling, nestled in marinara, and baked until the mozzarella bubbles and turns golden.

Crispy Zucchini and Squash
Golden, garlicky rounds with a deep-fried crunch made lighter in the air fryer. A fast, vitamin-packed side everyone devours.

Chicken Parmesan Meatballs
Tender chicken meatballs simmered in marinara, finished with melted mozzarella and basil for cozy, weeknight Italian comfort in every bite.
Did You Make This?
Leave a comment & rating below or tag @velvetyum on social media!
Rate This Recipe
Share This Recipe
Enjoyed this recipe? Share it with friends and family, and don't forget to leave a review!
Comments (1)
This recipe looks amazing! Can't wait to try it.
Comments are stored locally in your browser. Server comments are displayed alongside your local comments.

Hi, I'm Emma!
What's Popular

30-Minute Meals!
Join to receive our email series which contains a round-up of some of our quick and easy family favorite recipes.