
>>

Rich buttery cookies filled with gooey caramel and finished with a milk chocolate drizzle, inspired by the classic Twix candy bar.

This recipe is my answer to craving a candy bar and a cookie at the same time. I discovered these cookies on a weekend when I had a bag of soft caramels and a memory of the Twix bars I adored as a kid. The combination of a tender, buttery shortbread style base with a small pool of molten caramel and a smooth milk chocolate ribbon on top immediately transported me back to those simple delights. I began making them for holiday cookie exchanges and family gatherings and now they are requested at every birthday and potluck.
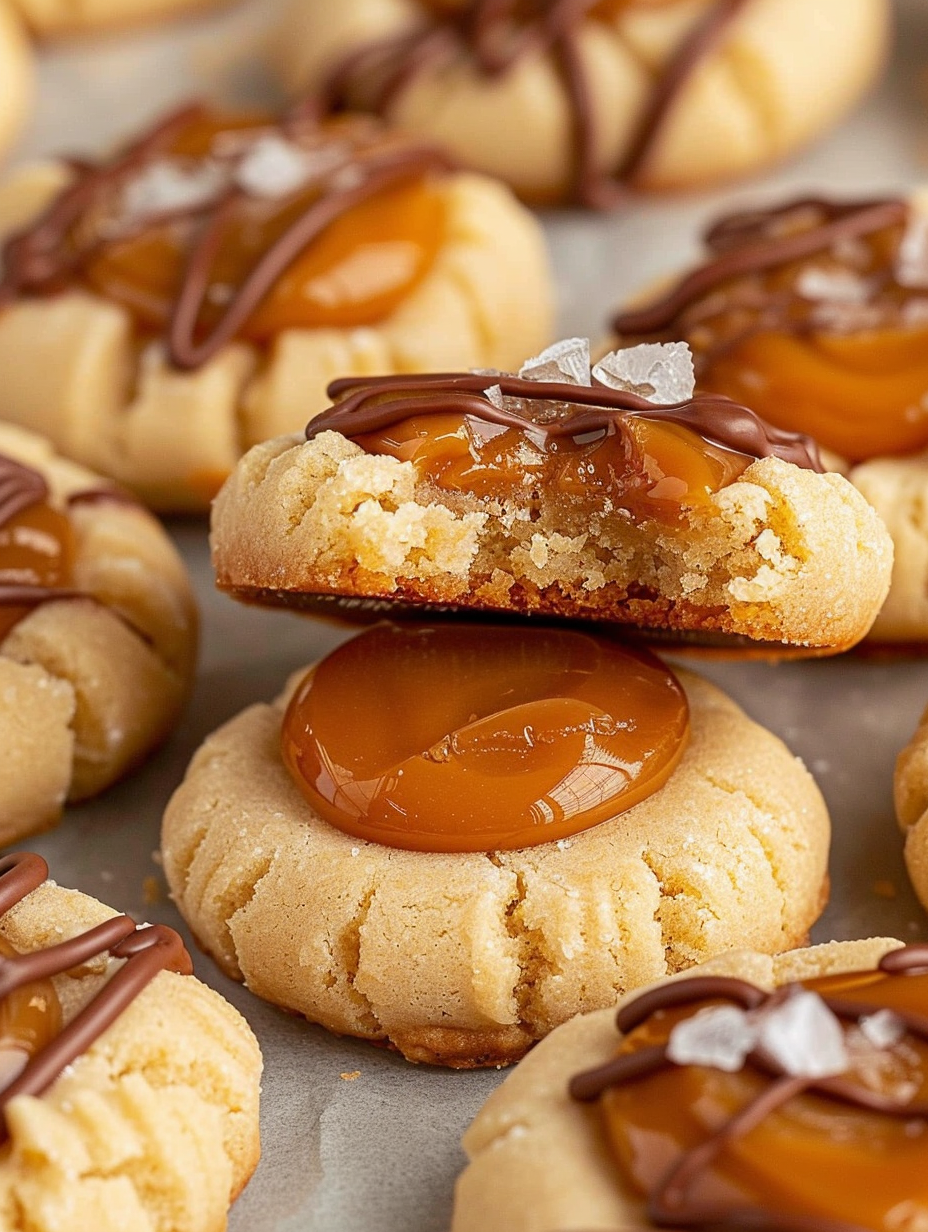
The texture is key to what makes these special. The dough bakes up with a gentle crumb that holds the caramel pocket without collapsing. The caramel stays soft but not runny, and when the milk chocolate sets it provides that familiar snap against the chew. For the finishing touch, a pinch of flaky sea salt brings the flavors into perfect balance. These cookies are slightly crisp at the edges and tender inside, and they make a tray of 35 that disappear faster than any single batch I have tried.
I still remember my sister taking a bite and closing her eyes as if she had been handed a small, nostalgic treasure. My cookie plates have been the centerpiece of many celebrations and sometimes I catch someone sneak two at a time. Recreating a candy bar as a cookie lets me control ingredients, portion size, and the quality of chocolate and salt I prefer, and that small change elevates the final bite every time.
My favorite part of this treat is how portable and gift ready they are. I often line a small bakery box with parchment and add a sprig of rosemary for a holiday plate. Guests always comment on the balance of sweet and salty and how the cookie captures the essence of a Twix bar without being overly sweet or greasy. The caramel remains pleasantly soft and not runny which makes them ideal for stacking in a tin.
Store cooled cookies in an airtight container layered with parchment to prevent sticking. At room temperature they keep for up to three days. For longer storage place them in a single layer on a tray and freeze solid, then transfer to a freezer safe container for up to three months. Thaw at room temperature for fifteen to thirty minutes before serving so the caramel regains its soft chew. If refrigeration is necessary allow cookies to come to room temperature so the chocolate loses refrigerator bloom and the flavor opens up.

If you prefer a darker chocolate swap milk chocolate wafers for four ounces of chopped dark chocolate or use a mix of both for complexity. For a lower sugar option try using a light brown sugar in place of part of the granulated sugar to add molasses notes and a slightly chewier texture. To make them gluten free use a one to one gluten free flour blend and chill a bit longer as GF dough can be softer. For a dairy free version select dairy free caramels and dairy free chocolate and use a plant based butter alternative that behaves similarly when creamed.
These cookies are excellent with a cup of coffee or a mid afternoon tea. For parties arrange on a decorative platter and garnish with small edible gold flakes or extra flaky sea salt. They pair nicely with fresh fruit like sliced pears or a citrus salad to offset the richness. For gift boxes separate layers with parchment and add a small cooling rack so cookies do not stick together during transport.
Thumbprint style cookies trace their roots to European cookie traditions where a small indentation is filled with jam or caramel. The idea of recreating candy bar flavors in cookie format is part of an American baking culture that blends nostalgia and innovation. These capture the spirit of the classic cookie and combine it with the iconic Twix flavor profile to create a hybrid treat that feels both familiar and new.
In autumn add a pinch of ground cinnamon and a quarter teaspoon of ground ginger to the dough for warm spice notes. For winter holidays add orange zest to the caramel to introduce bright citrus contrast. In summer lighten the topping by using white chocolate with a sprinkle of lemon zest or top with toasted coconut and a drizzle of dark chocolate for a tropical take.
Shape dough into balls and freeze on a tray until solid then transfer to a bag for baking whenever you need cookies. To bake from frozen add a minute or two to the bake time. You can also fully assemble and freeze the finished cookies on a sheet then move to an airtight container. Reheat briefly in a warm oven at low temperature for a just baked feel or allow to come to room temperature for best caramel texture.
These cookies are a celebration of simple technique and thoughtful ingredients. They are easy enough for a beginner to follow yet deliver complex flavor that impresses. Make a double batch and share them with friends because a tray never lasts long around my kitchen table.
Chill the formed cookies for at least thirty minutes to prevent excessive spreading and to keep a neat thumbprint.
When melting caramels heat in thirty second increments and stir between each to avoid scorching and graininess.
Use a small cookie scoop for uniform size so baking time stays consistent across the batch.
If the indents puff in the oven press them gently while still warm to restore the well for filling.
This nourishing twix thumbprint cookies recipe is sure to be a staple in your kitchen. Enjoy every moist, high protein slice — it is perfect for breakfast or as a wholesome snack any time.
Yes, shape the dough balls and freeze them on a tray until solid. Transfer to a freezer bag and bake from frozen adding about two minutes to the bake time.
If your caramels are stiff try adding an extra teaspoon of heavy cream and melt slowly in short bursts until smooth.
This Twix Thumbprint Cookies recipe makes perfectly juicy, tender, and flavorful steak every time! Serve with potatoes and a side salad for an unforgettable dinner in under 30 minutes.
Line two rimmed baking sheets with parchment and preheat the oven to 350 degrees Fahrenheit just before baking. Having sheets ready keeps the workflow smooth.
Beat one cup softened unsalted butter with three quarters cup granulated sugar on medium high for one to two minutes until light and fluffy to incorporate air for a tender texture.
Mix in two room temperature egg yolks and one teaspoon vanilla until fully incorporated for richness without extra moisture.
On low speed add two and one third cups all purpose flour and half teaspoon salt and mix until the dough just comes together to avoid overworking.
Using a one inch scoop or about one tablespoon, roll dough into smooth balls and place them onto the prepared sheet spaced one to one and a half inches apart.
Press a thumb or half teaspoon into each ball to form an indent, smooth cracks, and freeze the sheet for thirty minutes so the cookies retain shape when baked.
Place twelve chilled cookies on a prepared sheet two inches apart and bake for thirteen to fourteen minutes until the bottoms are lightly golden, then cool five minutes on the sheet.
Combine thirty five unwrapped caramels and two tablespoons heavy cream in a microwave safe bowl and heat in thirty second increments stirring until smooth to create a spoonable caramel.
Spoon slightly less than one teaspoon of warm caramel into each cooled indent, taking care not to overfill so that the caramel stays contained.
Melt four ounces milk chocolate wafers in short bursts and stir until smooth, then pipe or spoon a decorative drizzle over the cookies and sprinkle flaky sea salt if using.
Allow the chocolate to set for about ten minutes before serving. Store in an airtight container up to three days at room temperature or freeze for longer storage.
Last Step: Please leave a rating and comment letting us know how you liked this recipe! This helps our business to thrive and continue providing free, high-quality recipes for you.
Leave a comment & rating below or tag
@velvetyum on social media!

Tender grilled zucchini rolled with a basil-kissed ricotta filling, nestled in marinara, and baked until the mozzarella bubbles and turns golden.

Golden, garlicky rounds with a deep-fried crunch made lighter in the air fryer. A fast, vitamin-packed side everyone devours.

Tender chicken meatballs simmered in marinara, finished with melted mozzarella and basil for cozy, weeknight Italian comfort in every bite.
Leave a comment & rating below or tag @velvetyum on social media!
Enjoyed this recipe? Share it with friends and family, and don't forget to leave a review!
This recipe looks amazing! Can't wait to try it.
Comments are stored locally in your browser. Server comments are displayed alongside your local comments.

Join to receive our email series which contains a round-up of some of our quick and easy family favorite recipes.
